Templates are at the very core of what makes Luminar AI special. Nicole S. Young shows us how to make our own.
One addition to LuminarAI is the ability to create and apply Templates to your photos. If you are familiar with previous versions of Luminar, this section has replaced the Looks categories. (And, if this is your first time using Luminar, you can think of Templates as a type of preset.)
What is a Template?
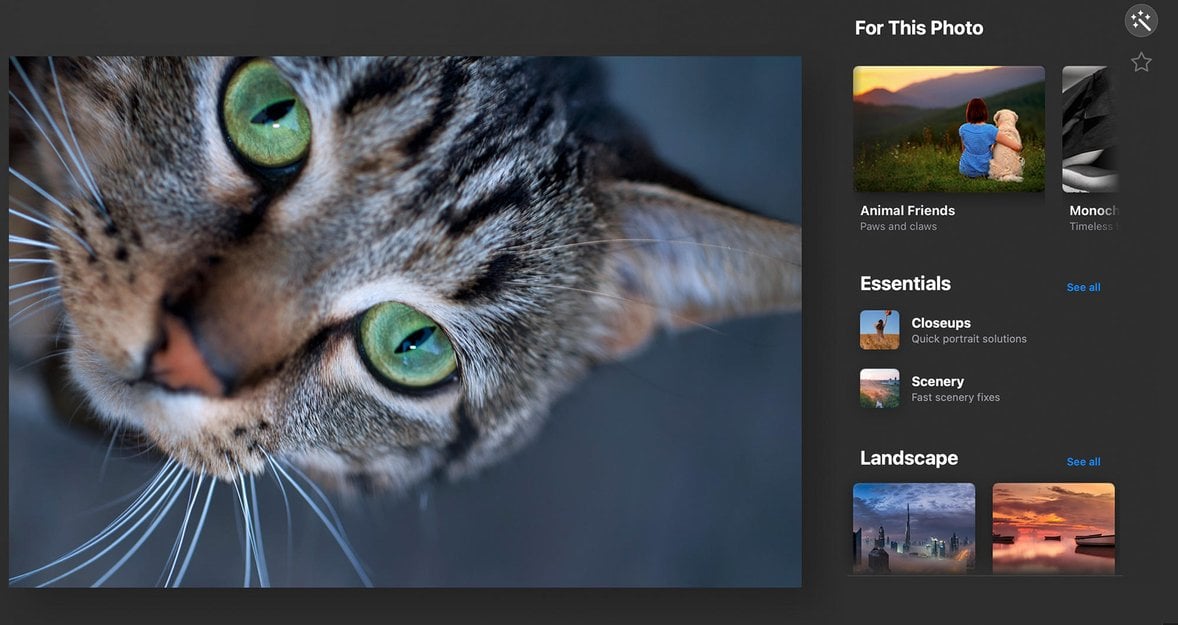
Templates in LuminarAI can be accessed using the Templates tab in the top Toolbar. Each template is a set of tools within the Edit tab, packaged together to easily be applied with one click. And not only that, Luminar will use AI to look at your photo and suggest templates it thinks will be a good fit. This is found in the For This Photo section within the Templates tab. For example, if you bring up a portrait in this tab, Luminar will suggest templates that are made specifically for images of people. The same goes for landscape, animals, food, and so on.
When I access the Templates tab with this photo of a cat, the first template Luminar recommends is the “Animal Friends” collection.
Tip: To apply a Template, simply click once on it to add the effect to your photo. Keep in mind that your existing edits will be replaced by the Template’s tools and effects.
There are also several categories to choose from, which you can access by scrolling down the right side of the window. You’ll see many of these categories appear with thumbnails, and if you scroll all the way down you will be able to view all categories of templates available in LuminarAI.
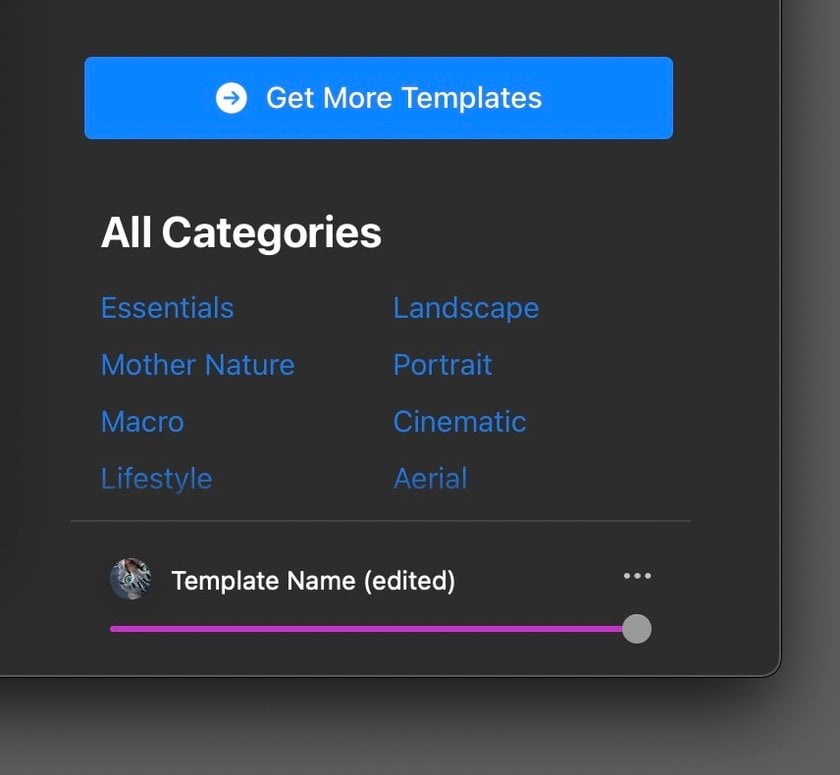
You can view all Template categories by scrolling all the way down on the right side of the window.
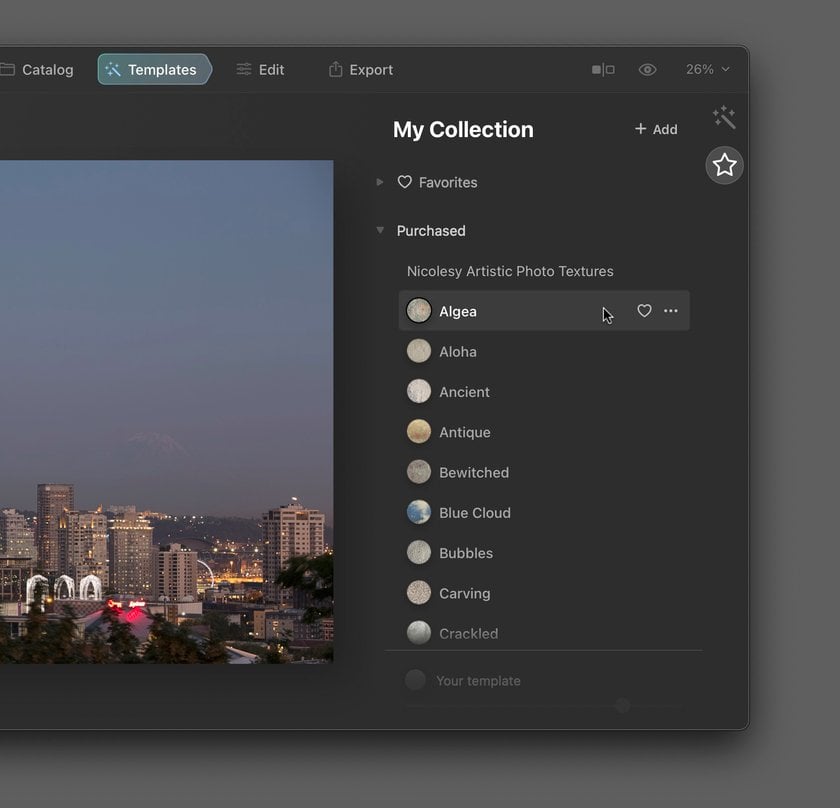
On the far right, if you click the star icon it will take you to the My Collection tab. This is where you will find any templates you have favorited, which you can do easily by clicking the heart icon to the right of any template within the Templates tab. And, if you would like to remove a template from the Favorites section, simply click the heart icon again to un-favorite it. You also can access any purchased or downloaded template packs in this section in the Purchased Collection, as well as your own custom templates (User Templates Collection), and if you had any Looks migrated from a previous version of Luminar, there might be some templates in the Legacy Collection as well.
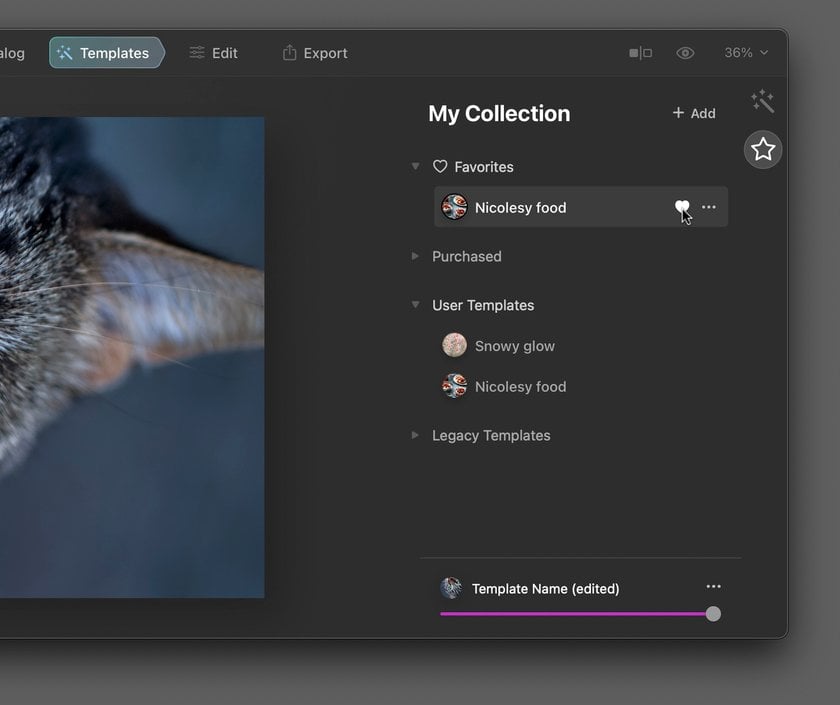
You can favorite or unfavorite templates by clicking the heart icon on the right of the template (hover over the template to access this icon).
Create your own custom Templates
Creating your own custom templates is a great way to speed up your workflow and apply the same settings to multiple photos. Templates in LuminarAI work well because the AI tools you use will apply to each photo independently, depending on what it requires. For example, if you create a template with portrait edits, but apply the template to an image without any people, the AI will ignore those edits and only apply the applicable tools to your photograph.
Here’s how to create your own custom templates in LuminarAI:
Step 1: First, open a photo and use the Edit tab to apply tools to your photos. (Keep in mind that cropping and the Erase tools will not save to a custom template.)
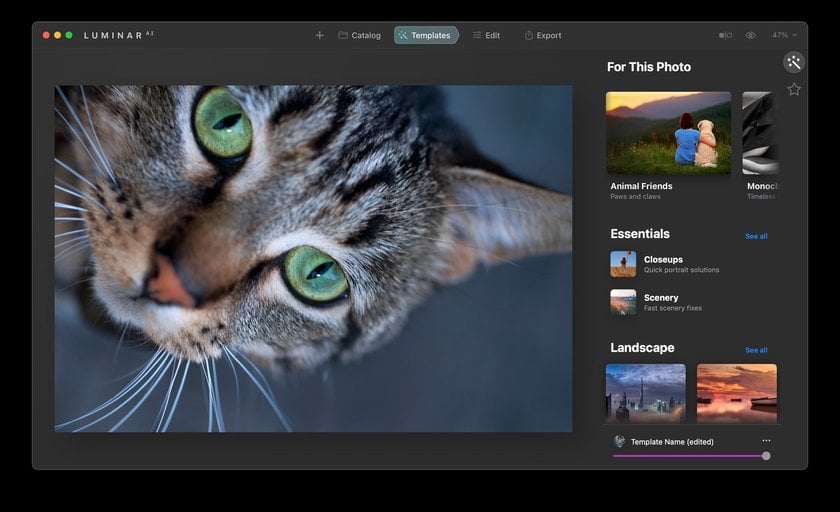
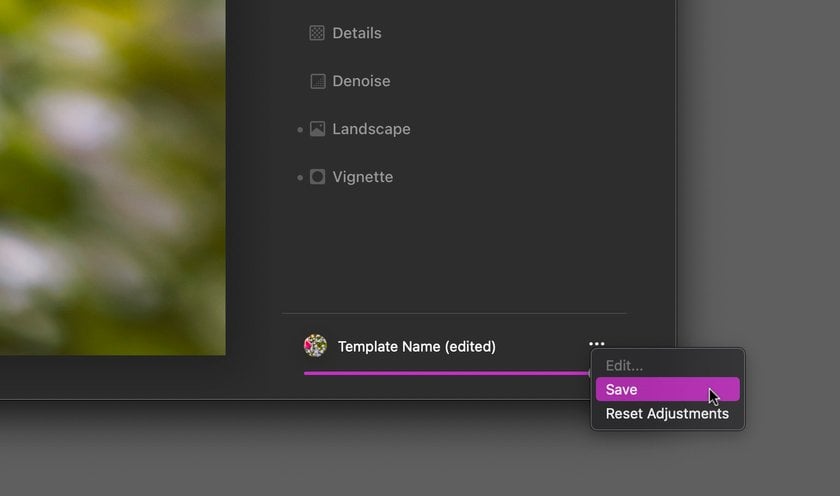
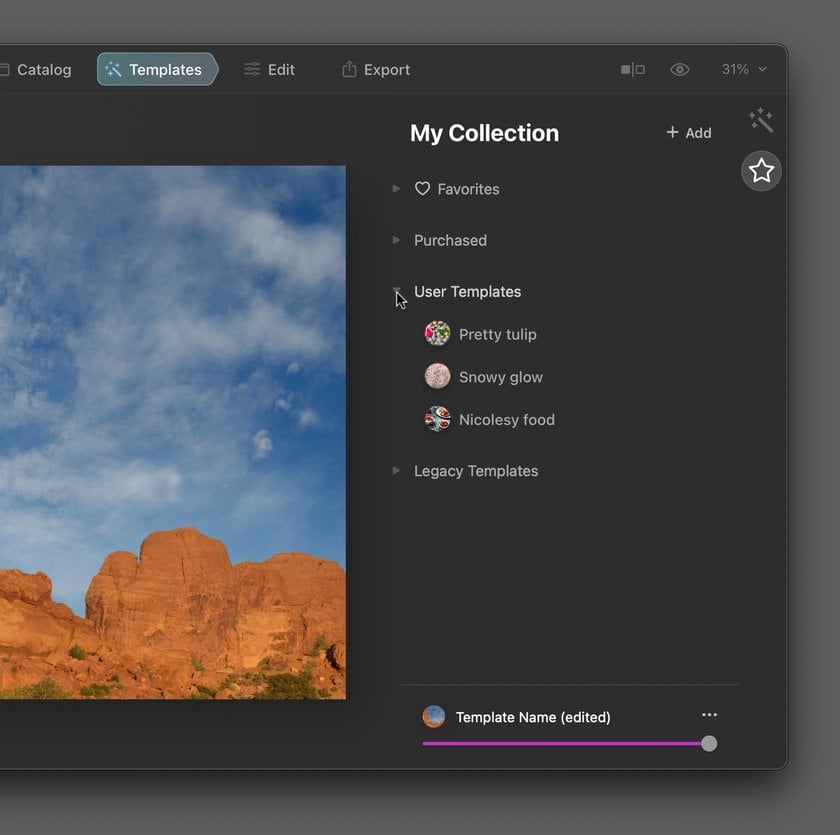
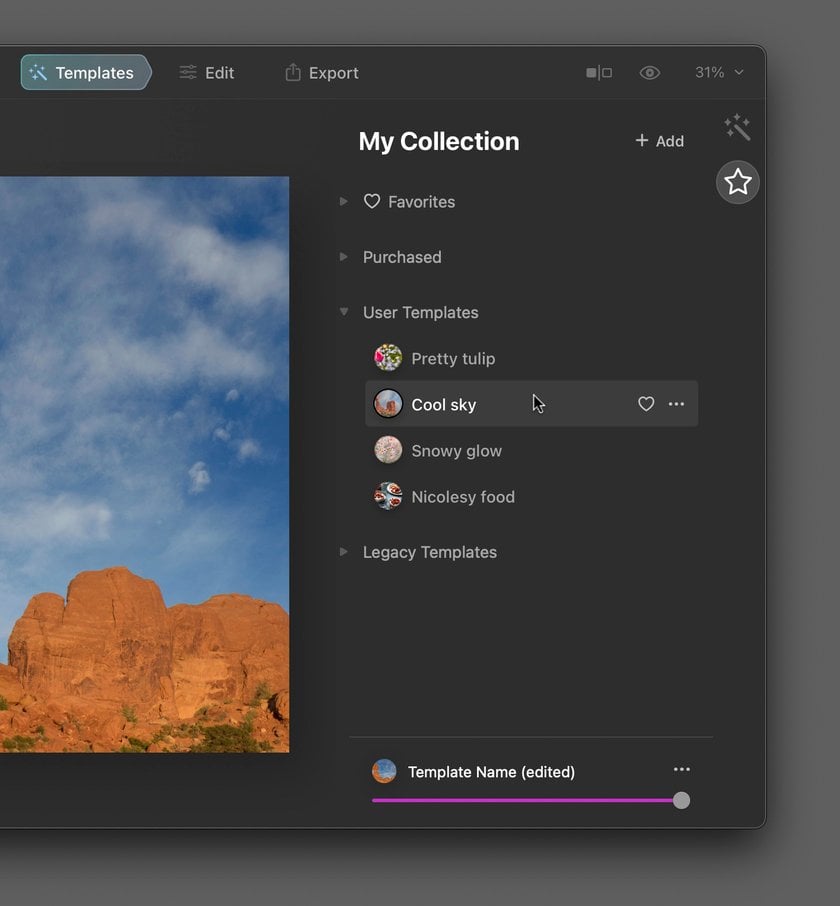
Step 2: Now, on the bottom-right of the window, click the three dots next to where it says
“Template Name (edited)” (this text may be different depending on how you created your template). Then, choose Save from the drop-down menu.
Step 3: The template is saved, but you’ll probably want to rename it. To do this, access the Templates tab, go to the My Collection tab, and access the User Templates collection. Click the three dots and choose Rename from the drop-down menu. Now your template is saved and ready to use on other photos!

Importing Template Collections
Importing a new Template Collection is a breeze in LuminarAI.
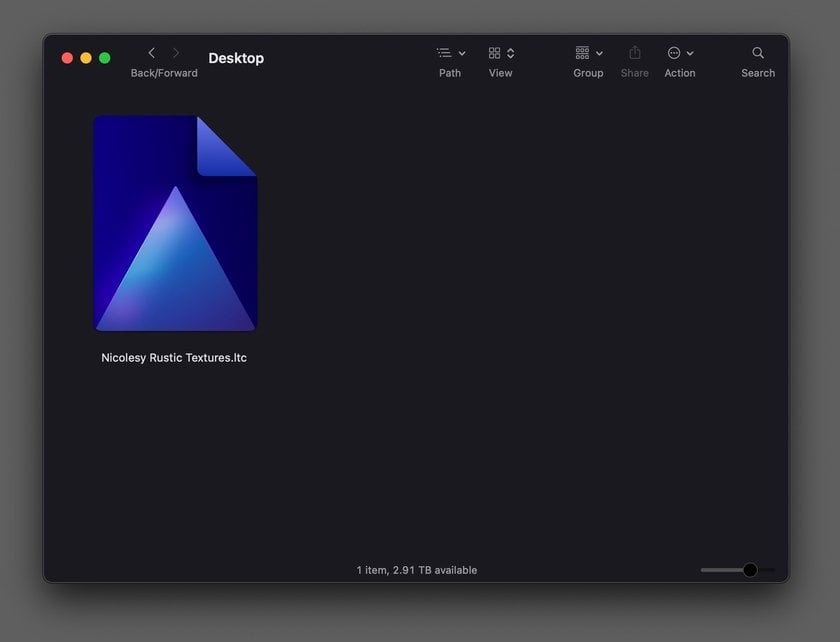
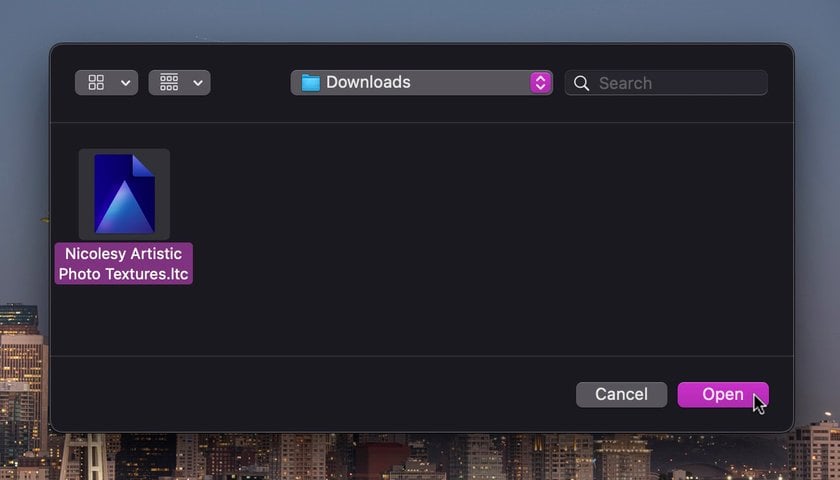
Step 1: First, you’ll want to make sure you have the correct file to import. The file type that imports into LuminarAI is .ltc.
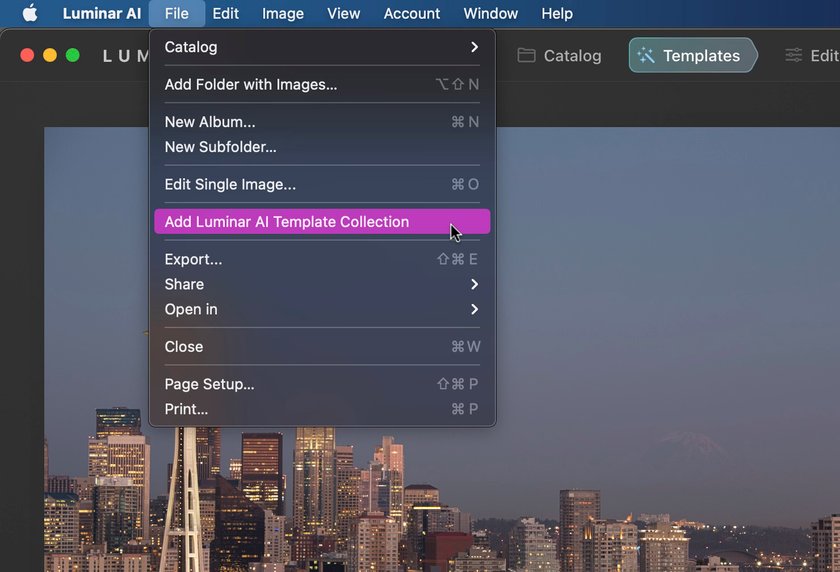
Step 2: Now, open LuminarAI and go to File > Add Luminar AI Template Collection.
Step 3: Locate the .ltc file you downloaded, select it, and click Open.
Step 4: To access this newly-added Template Collection, first access the Templates tab at the top. Then, click the My Collection tab and go into the Purchased section. Your Template Collection will now be listed in that drop-down.
Importing and sharing individual Templates
If you don’t have a packaged Template Collection that you would like to import, you can still share and add individual templates into LuminarAI.
Step 1: Go into the Templates tab, and access the My Collection tab on the right. Then, view the User Templates section.
Note: You will need to have at least one User Template in order to do this step. If the User Templates section is empty, first make a quick template (it doesn’t need to be anything fancy) so you have one template in this section.
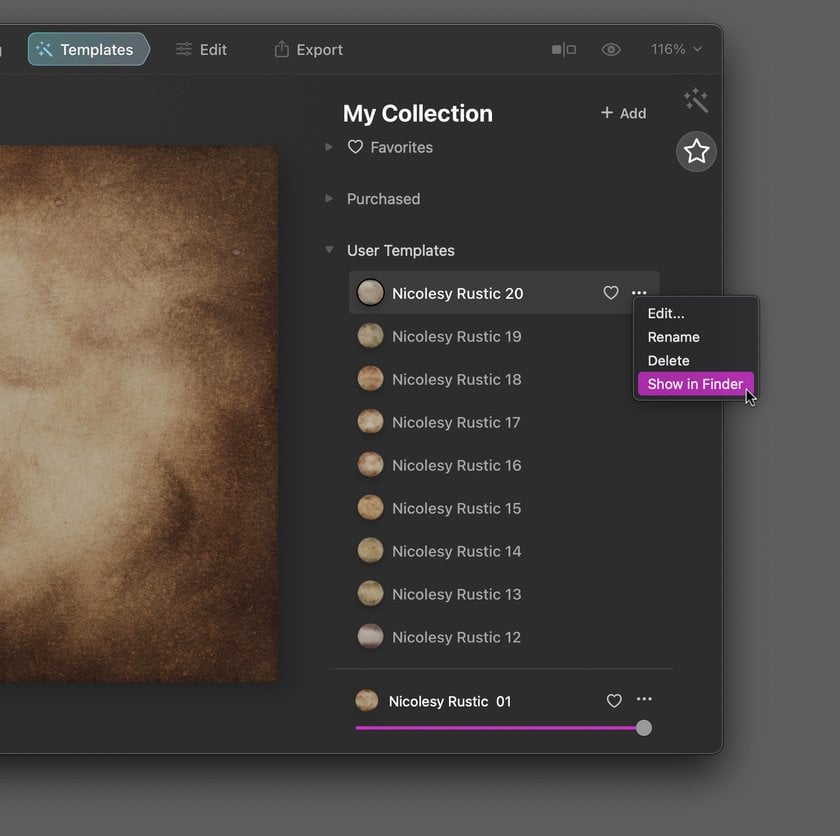
Step 2: Click the three dots to the right of one of the templates within the User Templates section and choose the option that allows you to view the template in your computer’s folder.
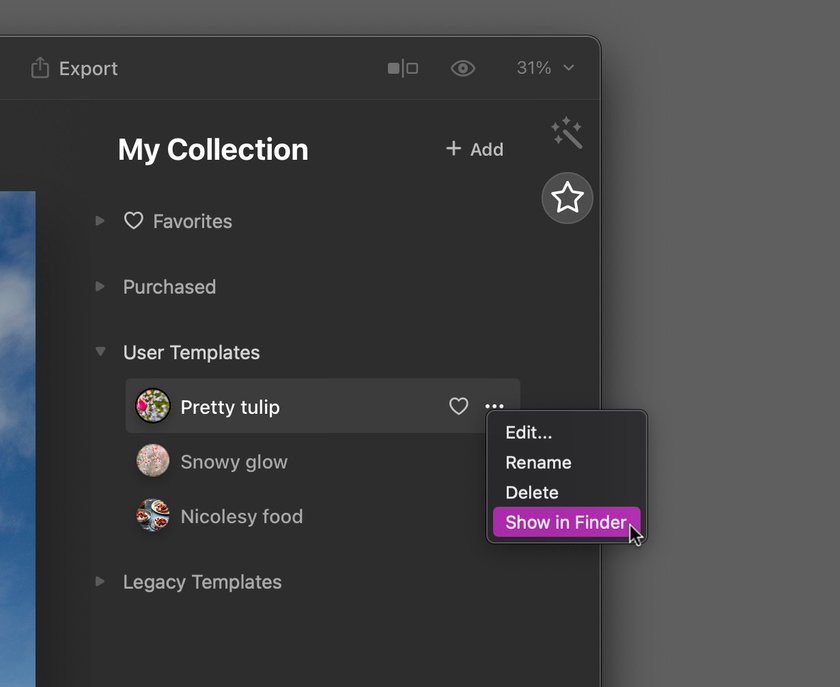
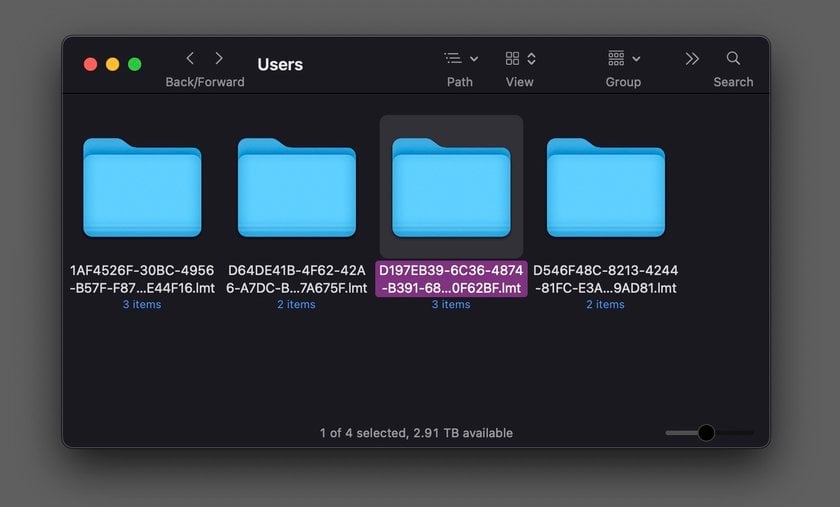
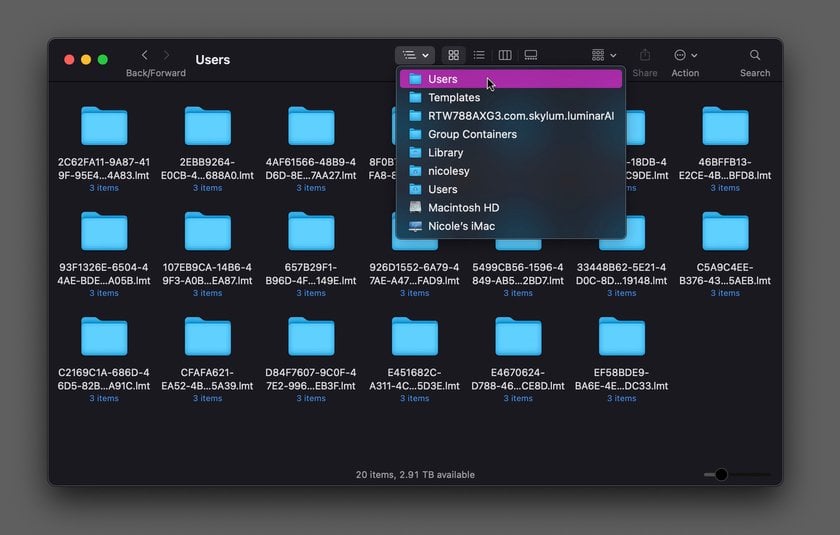
Step 3: Your computer folder will open and reveal the contents of the template you had selected. Back-track one level in the folder to get to the Users folder.

Step 4: If you have a template you want to share with others, you will want to share the entire folder of that template. (You’ll need to remember the folder name, since it will be a unique ID that distinguishes it from other templates and not in an easy-to-read format.) If you want to import an individual template, the Users folder is where you will place the template folder. Copy and paste the entire folder into the Users folder.
Step 5: If you added/imported a template into the Users folder, reboot LuminarAI. Then, reopen LuminarAI and access the Templates > My Collection tab, and you will see this new template in the User Templates section.
Packaging custom Templates for other users
If you want to share LuminarAI Templates with other users, or are like me and create digital presets and textures and wish to include an easy way for your customers to import the files into Luminar, then you will want to package your templates.
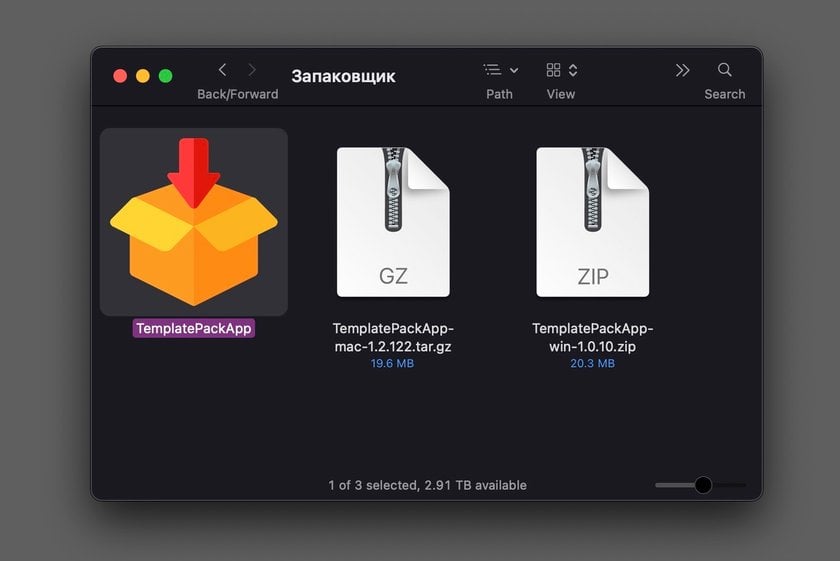
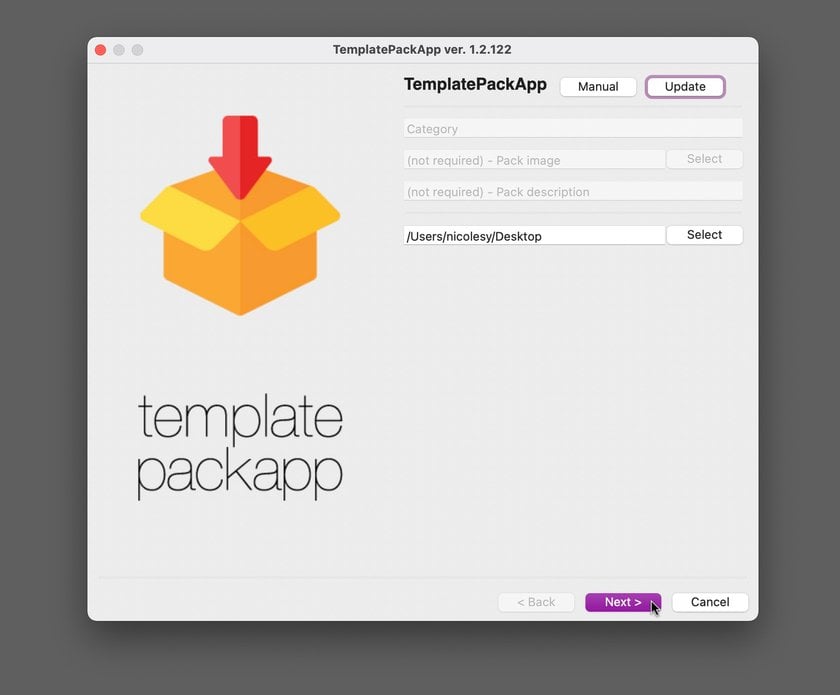
Step 1: Download the Template Packer.
First, download the LuminarAI Template Packer and unzip the file (add download link here). Then, in the folder that appears, unzip the file that is specific to your operating system (Mac or Windows). Once you do this you will have access to the TemplatePackApp application. Open the TemplatePackApp file to begin working with the LuminarAI Template Packer.
Step 2: Prepare your template and jpeg files.
Next, in Luminar, create the templates you want to package together. Once you have them all created, go to the Templates > My Collection tab and access the User Templates section. Click the three dots on one of the templates and choose the option to show the template in your computer folder.
You will also want to create a cover image for the entire pack, as well as example images for each template. Save these in a separate folder for easy access (you will need them in future steps).
Step 3: Access the templates on your computer.
Now, backtrack one level of folders until you get to the main Users folder. This will show you all of the custom templates you have created.
Tip: When creating your custom templates for a pack, I like to temporarily remove all other custom templates. This makes it easier to only work with the templates I want to add into my packaged collection.
Step 4: Open the Template Packer and begin creating your collection.
Now, access the TemplatePackApp application (open it if you have not already done so) and in the space where it says Save path, click the Select button. Choose a location where you want to save the final .ltc template file. Then click Next.
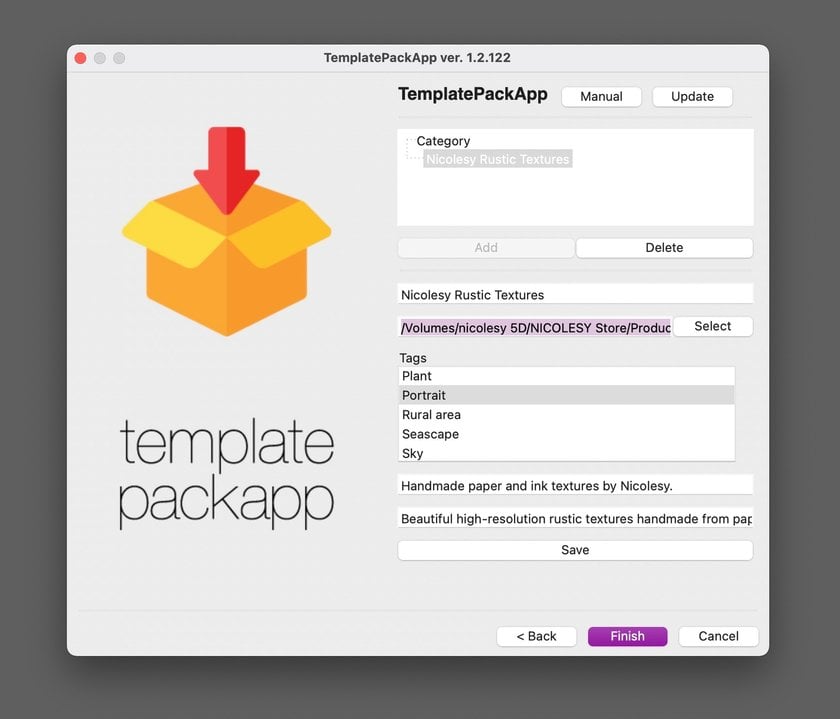
Step 5: Input information about your collection.
Click Add, and a new “Untitled collection” will appear under the category section. Click on Untitled collection to bring up the settings for this collection. Give your collection a Name, Short description, and Long description. Then, choose the tags that apply to your template pack. To choose more than one tag, hold Cmd (Mac) or Ctrl (PC) and click on multiple options. When you are finished, click Save.

Step 6: Add the cover image.
In the section that says “Image”, click Select and locate the cover image for your template collection. You can also drag-and-drop the image file directly over the path box to add it more easily.
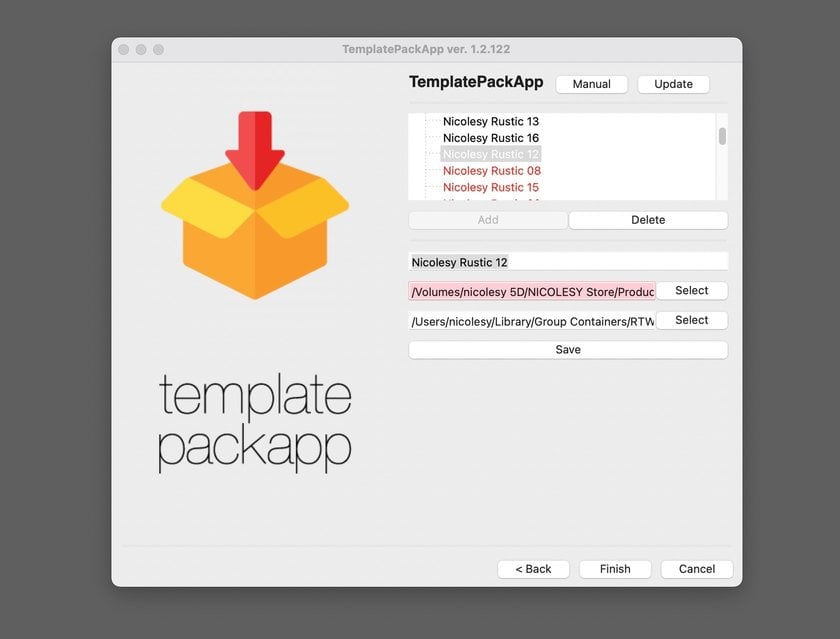
Step 7: Add the templates.
Access the folder containing the individual template files, highlight the templates you want to add to this collection, and then drag-and-drop the templates into the Category section at the top. The images will be red, which means they still need their template image files added (we’ll do this in the next step).

Step 8: Add the template image files.
To add an example image file to a template, first click on it in the list. Then drag-and-drop the image file over the Image area (or click Select and navigate to it on your computer). Continue doing this for all templates until they all have images associated with them. When you are finished, click Save.
Step 9: Create the final template collection file.
Once everything is completed filled out, click Finish at the bottom. In the window that pops up, click OK and your template collection will be saved to the location you specified in step 3. Now the new template pack can be imported into LuminarAI and display in the Purchased section of the My Collection tab.
Important: Make sure you have input everything correctly before clicking Finish! The Template Packer will close after it creates the collection so you cannot go back and make changes.