A Complete Guide to Luminar Neo
December 04, 2023

Emerging as a relatively new addition to the photography editing landscape, Luminar Neo represents the latest innovation from Skylum, a company deeply rooted in imaging technology. Despite its recent arrival, Luminar Neo inherits a legacy steeped in the success of its predecessors. Skylum, the visionary behind this groundbreaking software, has a storied history characterized by pioneering advancements in photo editing tools. Before the unveiling of Luminar Neo, the company introduced renowned products like Luminar AI and Luminar 4, setting a high standard for innovation and user-friendly editing experiences.
The given article provides an ultimate tutorial on how to use Luminar Neo regarding the users' experience and questions that might emerge as you start your editing journey with this cutting-edge AI-based software.
Getting Started with Luminar Neo
Before starting our Luminar Neo tutorial, we need to figure out how to get the software. It is necessary to consider that Luminar Neo is a paid software, so before integrating it into your creative process, you need to look through the purchase options and find what fits you best.
When you are satisfied with the purchase plan, check whether the Luminar Neo software is compatible with the device you will work on. Luminar Neo works on both Windows and MacOS. The operation system requirements can be found here.
The First-Time Luminar Neo Installation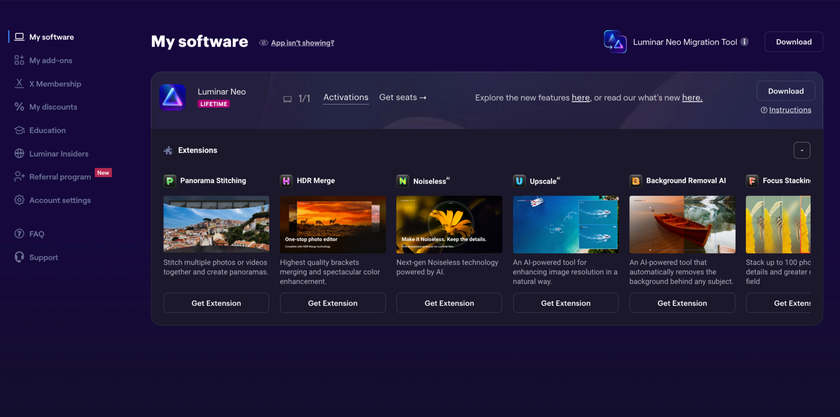

If your computer matches the given parameters, feel free to install Luminar Neo:
Go to skylum.com, login, or register (use the same email address you used for the software purchase).
In your Skylum Account, you will see a My Software tab with all of your Skylum software, including Luminar Neo.
Find Luminar Neo in your list of software and download it by clicking the Download button.
You can activate Luminar Neo by logging in to your Skylum account and visiting the My Software tab.
How to Use Luminar Neo on Different Devices
If you want to install Luminar Neo on several devices, there is an option. You can always get additional seats by clicking the Get Seat button. New device(s) will be added to the list as soon as you activate Luminar Neo on them, and the old device(s) will be automatically added when you launch the app. More on this here.
If you need to deactivate a device, then the Reset buttons are available for each product you own. Click on Activations > Reset activation to remove a specific device or Reset all activations to remove all activations at once.
And that's all. It sounds like nothing complicated, right? However, if you still have questions, we suggest you read our comprehensive user guide.
Let's Explore the Interface
The Luminar Neo tutorial for beginners starts with observing the software’s interface. Luminar Neo presents a user-friendly interface structured around three primary tabs: Catalog, Presets, and Edit, each catering to specific aspects of the editing process. Let's take a closer look.
Catalog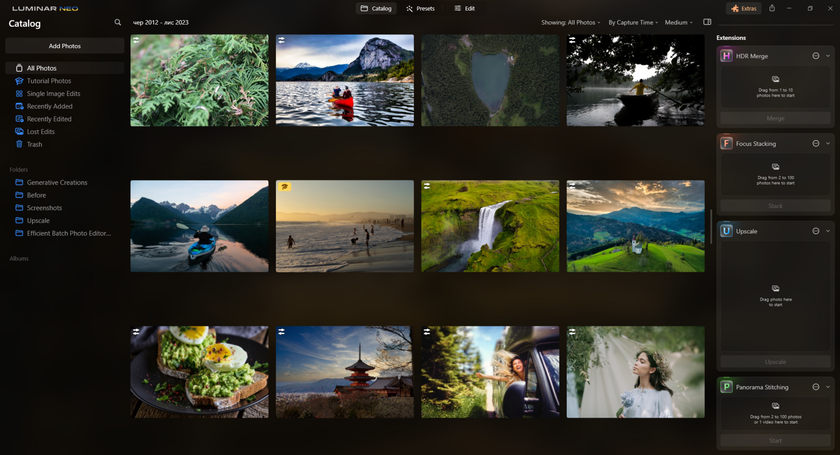

This section is a centralized space within Luminar Neo, enabling users to manage and organize the image files efficiently.
Your images are under your direct control, and your choice organizes them. For example, you can review your Catalog and identify any redundant or unnecessary files, such as duplicate images, test edits, or low-quality photos. Remove these files from the Catalog to free up space. In Luminar Neo, you can usually delete unwanted images directly from the software by selecting and deleting them from the Catalog.
Deleting images in Luminar Neo is a straightforward process. Select the photos you want to remove within the Catalog or Library module. Right-click on the selected images or use the delete option from the menu bar. Confirm the deletion when prompted. Remember, deleting images within Luminar Neo only removes them from the software's Catalog or Library, not your computer's storage.
You can also archive your files. It is a must-have for seasoned photographers who work on different projects. Luminar Neo may generate cache and temporary files during editing, which can accumulate over time and occupy space. Periodically clear these temporary files within the software settings or preferences to free up storage.
Adjust settings within Luminar Neo to optimize image storage if you need to reduce the size of your Catalog folder. For instance, consider using more efficient image formats or resizing images to lower resolutions, especially for ideas not intended for high-resolution printing.
If you still have questions, you can learn more about this space in our user guide.
Presets
Here, users can promptly explore and apply pre-configured settings and adjustments to their images. The Presets tab provides access to various customizable presets, offering quick and convenient ways to enhance photos with distinct styles and effects.
You can also create custom presets based on filters, styles, and effects you would like to use on multiple images. These presets can be transferred to a new PC. Copy the folder or preset files you want to move to the new PC. Paste the copied preset files into the corresponding folder or directory in Luminar Neo on the new PC. It might involve navigating to a specific folder within the Luminar Neo directory on the new PC where custom presets are stored. Catalogs can also be similarly transferred to a new PC.
The Edit Tab: Core Editing Tools Explored
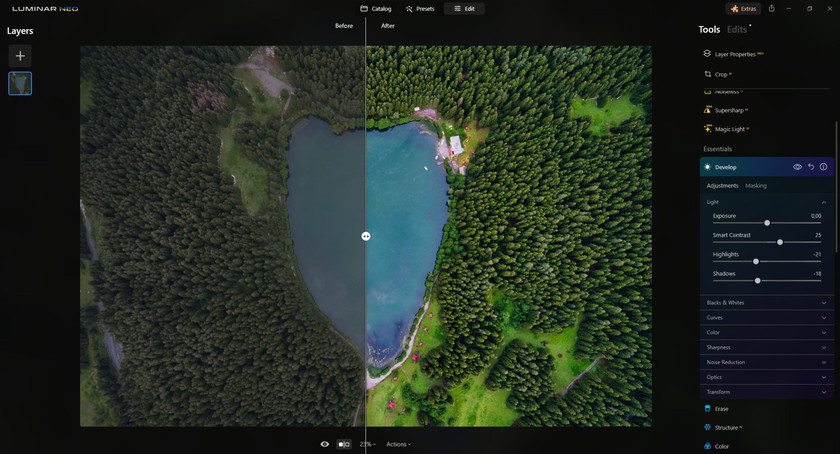 From basic adjustments like exposure, contrast, and color vibrancy to more advanced features such as AI-powered enhancements, Luminar Neo users can effortlessly refine their photos to achieve desired results. Explore a diverse range of specialized filters and effects within Luminar Neo, including AI Sky Enhancer, Accent AI, Structure AI, and more.
Layers Panel
Users can add multiple adjustment layers containing unique edits, allowing for precise control over various elements within an image. To use the Layers panel effectively:
Access the Layers panel and click the "Add New Adjustment Layer" icon. Apply specific edits or adjustments to each layer independently without altering the original image.
Utilize layer masks to apply adjustments to specific areas of the image selectively. Experiment with blending modes to achieve different effects by blending layers seamlessly.
Adjust the opacity of individual layers to control the intensity of applied edits. Arrange layers in a specific order to determine the hierarchy of adjustments, influencing the final image output.
Users can unleash their creativity by familiarizing themselves with these core editing tools, bringing out the best in their photographs within Luminar Neo's intuitive editing environment.
Extensions
Luminar Neo extensions are add-ons that enhance the functionality of the Luminar Neo software. These extensions are designed to perform specific tasks or add new features to the software. Luminar Neo extensions can be purchased separately or as a Pack, which includes all eight extensions. Once an extension is installed, it integrates into the Luminar Neo software.
To install the extensions:
Click the puzzle-like icon.
Choose "Install" near the corresponding extension.
You will see HDR Merge, Upscale AI, and Focus Stacking effects in the Catalog mode. Super Sharp AI, Background Removal AI, and Noiseless AI occur in the Edit mode. Version 1.16.0 of the Luminar Neo software includes new tools like GenErase and GenSwap.
If you want to install the Luminar Neo extensions on a second device:
Ensure that Luminar Neo runs on that device, open it, and go to the Extensions section.
Choose the attachment (s) you want to install on the second device.
Click on the "Add" button associated with each extension.
Verify that the wings are successfully installed and accessible within Luminar Neo's interface. You should see the installed extensions available among the editing tools or effects within the software.
Workflow Integration
By incorporating Luminar Neo as a plugin, Photoshop users can access its diverse set of powerful editing tools and AI-driven enhancements without leaving the familiar Photoshop interface. This integration allows photographers and designers to leverage both platforms' strengths, combining the advanced capabilities of Photoshop with the creative enhancements and intuitive features offered by Luminar Neo, streamlining the editing workflow and facilitating a more comprehensive approach to image editing.
By seamlessly integrating Luminar Neo as a plugin, Lightroom users can leverage the advanced editing tools and unique features of Luminar Neo directly within the Lightroom interface, enhancing the editing process with the ultimate AI capabilities without rejecting the comfortable and familiar ecosystem of Lightroom.
Conclusion
Luminar Neo emerges as a powerful and versatile photo editing software, building upon Skylum's legacy of innovation and user-centric design. This comprehensive guide has navigated various facets of Luminar Neo, highlighting its intuitive interface divided into Catalog, Presets, and Edit tabs, each offering unique functionalities. Users can efficiently manage their Catalogs, reduce folder sizes, and seamlessly transfer Catalogs or custom presets between devices.
Luminar Neo's extensions, such as GenErase and GenSwap, further amplify its functionality, while seamless integration as a plugin for Photoshop and Lightroom extends the software's reach, enriching users' editing experiences. Whether refining images, exploring advanced editing techniques, or integrating with other industry-standard software, Luminar Neo is a versatile solution, shaping the future of photo editing with its innovative features and user-centric approach.
For more advice and tips, you can always check the Something Useful page.
FAQ
Why Are There Exclamation Marks on Images (Lost Edits)?
Exclamation marks on images within Luminar Neo often indicate the edits made to those inaccessible or disconnected images. It could happen if the original files associated with the edits have been moved, renamed, or deleted. Reconnect the images by locating the original files in their new location or restoring them from a backup. Once reconnected, Luminar Neo should regain access to the edits, eliminating the exclamation marks and restoring the edits to the images.
Where Can I Find the Tools from Luminar 4 and Luminar AI (Augmented Sky, Composition, Lens & Geometry)?
Luminar Neo might have restructured or updated its interface, resulting in changes to tool placement or accessibility. To locate familiar tools:
Check the sidebar or toolbar within the Edit tab for a dropdown menu or icon that contains additional tools or adjustments.
Look for specific tool names or functionalities in the menu bar or under different categories within the Edit tab, as they might have been renamed or integrated into different sections for a more streamlined editing experience.
Refer to the official Luminar Neo user guide or support resources by Skylum.
Why Can’t I Find the Histogram?
In Luminar Neo, the histogram might be accessed in the Edit tab, typically within the sidebar or toolbar where various editing tools are located. Look for an icon or option labeled "Histogram" or "Histo" that displays the graph representing tonal values. If you need help locating the histogram, consult the software's user guide or seek assistance from Skylum's support.