11 Cases When Low-angle Shots Work in Urban Photography
September 26, 2018

Learn the best ways to make awesome low-angle shots in urban photography.
Beginners might think that low-angle shots are unflattering when it comes to portraits. Who hasn’t accidentally switched on the selfie camera on their phone and thought that this angle is the worst? You might think that this also concerns outdoor shots and other types of photography. However, you can use low-angle shots in many ways to create stunning photos of buildings, people, and silhouettes and shatter that misconception. Here’s how to do it.
Low-angle photography perks
1. Unusual perspective

We’re used to seeing the world at eye level. That’s why low-angle photography might feel like looking through the eyes of someone smaller. It might be a child, an animal, or even an inanimate object on the street. This will certainly make your viewers linger on your photo and wonder about the change of perspective. At any rate, the effect will be different, and thus creative.
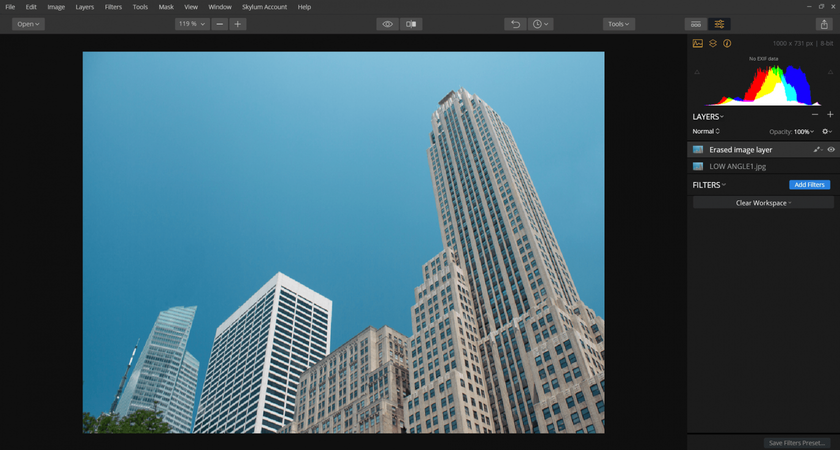
2. Eliminate details
When you take a low-angle shot, there are few distracting details in the background. Indeed, everything else becomes secondary and the sky or the ceiling is your canvas. This works especially well in urban landscape photography. If you still have trouble with some unwanted details, you can use Luminar to erase them with its handy erase tool. Click to buy Luminar now.

 3. Simplification
 3. Simplification
With low angles, your shots will become clear and clean, focusing on the main subject. It’s hard to take an overcrowded shot when you’re taking a picture of a street, building, or bridge from below. Even if there are people, they’ll be simplified and not create the crowded effect.
4. Silhouettes

When you take a photo of people’s dark silhouettes from a low angle, the darkness of the shadows on the ground won’t impact the overall photo and make it too dark. The silhouette will add a dramatic effect and create a great composition.
5. Backlight for details

Shooting from a low angle allows you to manipulate light to your advantage. You can practice on flowers and see how much more vivid they become when the petals are shot in backlight. The vivid colors will create a stunning effect.
6. Reveal details above
You don’t have to take pictures only of skyscrapers. People on glass floors, street lamps, street lights, beautiful halls, and staircases are all potential candidates for your low-angle shots. Shot from below, anything can look intriguing, making the viewer dwell on your photo a bit longer than usual.
7. Dramatic effect with lines
Consider the lines that the city provides: tram lines, sidewalks, the beautiful architectural lines of bridges: they all can create a dramatic and extreme effect if you take your pictures the right way. There’s no need to straighten photo if you know that lines are what add the drama.
8. More foreground

A low-angle shot is often used to emphasize the foreground. Whether the sidewalk is a snowy carpet or the autumn leaves create a beautiful effect, you can bring them out in your low-angle shots.
9. Less foreground
The opposite is also true: low-angle photography lets you concentrate on high buildings and the sky above. Since the sky will take up a major part of your photograph, remember to use the handy AI Sky Enhancer tool in Luminar to enhance the sky with a single slider. This tool works for all of your shots, not only for low-angle shots.
10. Superman effect
Shooting people from a low angle will result in a really great superman effect: people will look bigger than they are, more dramatic, and highly creative. It doesn’t matter if they’re kids or adults: the effect can be applied to anyone.
11. Reflections
Use mirrors, glass panes, or anything that can help you build a creative visual effect. Play with reflections and draw the attention of the viewer in your low-angle urban shots. Shooting from a low angle will allow you to capture even more reflections and achieve a stunning kaleidoscope photo effect.
Urban photoshoot themes to explore
Architecture
Obviously, cities are the go-to places to find stunning architecture shots for urban photoshoots. Explore your city and find something besides the landmarks that everyone takes pictures of. Focus on buildings that capture your attention and imagination. There are bridges, lamp posts, old buildings, gates, towers, factories, churches, and a whole variety of architectural wonders to explore. If you edit them well, you can create amazing Tumblr pictures and get lots of followers.
People and animals
Even though it’s not common, people can also be part of your urban photography. People shot from a low angle tend to look bigger and more dramatic. Try not to shoot portraits, as features will really be exaggerated. You can also take pictures of various city animals, such as birds, dogs, and cats. However, if you want to take a picture of someone’s pet, be sure to ask permission and be polite while doing so.
Details
The devil is in the details. Draw the attention of your viewers to something unusual and let them wonder about the beauty of the surrounding world. A great way to do this is to learn to take urban HDR photography, which emphasizes the details and enhances your low-angle shots. The key is to take multiple brackets and compose them into one picture that draws out all the details. Some details of the city that you can use are cars, trams, taxis, garbage bins, windows, graffiti, fire escapes, chimneys, plants, balconies, or anything that draws your attention and has some peculiar feature.
Time of day

Something else to consider in addition to camera shots and angles is that different times of day will create different effects. Shoot at dusk, at dawn, and during the day and see which particular atmosphere reflects your creative vision the most. In the city, you can carry on shooting well into the night to create great looks for your photos. One amazing advantage of shooting in an urban environment is that you can continue with your work even when the sun has gone down. As day turns to night, the city is lit by different light sources as street lights and interior lights of buildings illuminate the environment. Grab a tripod, connect a cable to your camera, and get set for some great new possibilities. Remember to keep your exposure time at a few seconds or even minutes if you want to capture some creative light effects.
Technical details
It’s important to keep some technical details in mind when going out on your urban photography hunt. Your low-angle shooting may improve if you have a few tricks up your sleeve.
Viewfinder issues
You can start to ignore your viewfinder, as it’s unlikely that from the ground you’ll be able to clearly see what you’re shooting. However, if your camera has Wi-Fi, then you can connect it to your smartphone and use it as your viewfinder. Take a lot of photos and the likelihood of getting that perfect shot will increase along with your photo shooting experience.
Lenses
People prefer to choose a compact camera as it’s light, small, portable, and ideal for low-angle shooting. As for the lens, the most commonly used lenses for urban photoshoots are wide and ultra-wide. The reason is that they can include more in the scene. You can experiment with lenses to see what best suit your needs. Standard lenses are 35mm or 50mm. Start with a wide-angle lens (24mm), then go as low as an ultra-wide lens (10mm).
ND filter
A neutral density (ND) filter can help you create dynamic results. Grab a tripod and set your camera for a long exposure photo session. You can blur movement from clouds and water with an exposure of 1 to 3 minutes and capture the contrast with the static subjects of the city. This is a particularly useful technique when the weather is overcast and offers a different way of capturing your city.
Being safe

Another technicality to keep in mind is that you need to be safe when taking your urban photos, and especially low-angle shots. Walking around the city, lying on the sidewalk, and looking out of windows is perfectly safe, but only if you pay attention to the cars, other passersby, and everything else around you that might damage you or your camera. Another tip is to always ask permission before taking photos of strangers or their belongings as well as private properties around the city.
Editing tips
There are a lot of post-processing techniques to explore for your low-angle shots, and there are a few basic ones we’ll share. A polarizing filter adds impact to your shots. On a sunny day, you can use a polarizing filter to deepen the blues of the sky (along with AI Sky Enhancer). Not only that, the polarizing filter in Luminar can also be used to reduce glare and reflections from any glass surface, again adding impact by increasing contrast in low-angle photos. Remember that when enriching the sky, polarizers only work at a 90-degree angle to the sun, but they work at most angles when reducing glare from windows.
Luminar has a ton of other effects that you can use to make your low-angle shots stand out. You can even try the specially designed outdoor presets for urban photography. Check them all out before buying with a 14-day free trial of Luminar. Click below to start your trial now.


