Fashion Photography Tips That Elevate Your Vision
March 02, 2026

Secrets of high-quality fashion photography: professional recommendations for developing creativity and creating unique visual content.
Modern fashion photography is more than showing clothes. It turns a look into a scene, where composition, light, and mood carry the message. Many shoots move away from a polished “glossy” style and focus on cleaner shapes and stronger contrast. When the lines of the body and the movement of fabric work together, even a still frame can feel cinematic.
Professional fashion photography tips help build that control. Light guides the viewer’s eye: texture adds depth. Small choices in styling and posing decide what stands out first. Technical accuracy is the base, not the finish line. That is why this niche can feel demanding at the start. This article shares practical tips to help beginners get into fashion photography with confidence.
Your AI-Powered Photo Editor for MacOS and Windows
Discover Now!Don’t feel like reading the whole breakdown? We’ve pulled together a quick summary below.
Key Takeaways
Fashion photography is storytelling, not just clothing. Composition, light, and mood should carry the message, especially in modern shoots that lean toward cleaner shapes and stronger contrast.
Direct model guidance improves every frame, because vague prompts create awkwardness. Use precise directions (elbows wider, chin to shoulder, feet shoulder-width, torso turned by degrees) while keeping communication calm and respectful.
A cohesive theme keeps the series “premium”: pick one dominant graphic idea (minimalism with straight lines, or baroque texture overload) and keep contrast and colour temperature consistent across scenes.
Bold posing creates high-fashion energy. Twists, asymmetry, and multiple “touch points” with the environment build architectural tension, making fabric fall into expressive folds and giving the frame a cinematic structure.
Studio control vs location improvisation is a real trade-off. In-studio, flags and controlled shadows help show cut and texture; on location, borrow structure from architecture and natural shadow rhythms, then use portrait enhancement to recover lost detail.
Lighting is the main tool for attention control. Hard side light for fabric micro-relief, reflected fill to keep seams/buttons readable, back accent to separate dark looks, and negative fill to boost contrast and sculpt the silhouette.
Backgrounds and props should support the concept. Choose geometry that elongates the body (columns, narrow openings), avoid visual noise, and use contrasting textures (stone vs silk, glass highlights) or foreground layers to add depth without stealing focus.
Final Verdict: Build one clear concept, direct the model with precision, and shape the scene with intentional light—then let backgrounds, props, and smart retouching reinforce the story instead of competing with it.
Confidently Guide Your Model for Impactful Shots
 The outcome of a fashion shoot depends directly on how accurately the photographer conveys their idea to the model. Therefore, confident guidance throughout the process eliminates awkwardness, enabling the outfit's full potential to be realized. However, even when fully immersed in the process, the dialogue should be calm and respectful of the other person's work: if you build a trusting relationship with the model, the process will become easier, and the quality of the photos will improve due to the additional motivation.
General phrases such as “stand up” or “show yourself” will only work in conditions of established mutual understanding, when there has been a long period of cooperation. In all other situations, you need to convey your idea more clearly: ask the model to spread their elbows as far apart as possible or press their chin tightly against their shoulder, place their feet shoulder-width apart, or turn their torso a certain number of degrees.
Establish a Cohesive Theme for Your Fashion Shoot
 The integrity of a series of photographs begins with the selection of a unified visual theme that connects the location, makeup, and styling into a common narrative. Working in the genre of high fashion photography requires the specialist to subordinate each element of the frame to a specific era or color code to avoid stylistic chaos.
To create a premium aesthetic, choose a dominant graphic idea—for example, stark minimalism with straight lines or baroque excess with an abundance of textures. Try to maintain the same contrast and light temperature in all scenes to keep the narrative rhythm, but if something goes wrong, there is always a solution: Luminar photo editor allows you to comprehensively edit photos using built-in AI algorithms. If the photos were taken in the same lighting and with the same camera, you can simply edit one image and then transfer the settings to the others in just four clicks.
Draw Inspiration from Creative Posing Ideas
 Avant-garde photography is born through the rejection of naturalness and the search for bold hyperbole. Use the “twisting the body” method: have the model turn their knees to the side and their shoulders to face the camera. The tension created in the body causes the fabric to fall in natural, contoured folds, emphasizing the cut better than any styling. Add radical asymmetry by asking one arm to remain completely lifeless and the other to form a broken line at the chin.
Build interaction with the environment through “touch points” in different planes. Have the model lean on their heel, press their shoulder blade against the wall, and touch their knee with their palm at the same time. The positioning is complex, but this is what makes the figure literally screw itself into space, creating a complex architectural rhythm.
Utilize Studio and On-Location Settings Effectively
 Working in a studio gives you complete control over the light and shadow pattern, allowing you to use flags to cut out unwanted glare. This is ideal for creating complex textures that require the viewer's attention to be drawn to the cut of the clothing or the geometry of the model's pose. Even with the right equipment, outdoor shooting cannot boast such convenience: use the architectural lines of buildings or the rhythm of shadows from trees to compensate for this.
The loss of expressiveness of specific details is an expected feature of the process outside the familiar four walls. Just use the AI portrait enhancer tool to make corrections in a few clicks. Artificial intelligence independently recognizes where the main elements of the image are located and will work with them without disturbing the surrounding space.
Enhance Your Outfit Images with Our Fasion Photo Editor
Start Your Free TrialMaster Lighting Techniques to Highlight Your Subject
 To control the viewer's attention, use light as a drawing tool that defines the boundaries of the silhouette and the density of materials. The exact position of the light sources determines how expressive the cut of the clothing will look and how the shadows will emphasize the anatomical features of the face.
Hard light drawing. Set up a reflector without attachments at a 45-degree angle to the side and slightly above the head. This will create deep shadows under the cheekbones and reveal the micro-relief of fabrics such as satin, leather, or beaded silk.
Fill through reflection. Direct an additional soft light source into a white flag reflector on the opposite side. This technique softens the black gaps in the shadows while maintaining the visibility of seams and small buttons on dark items.
Counter accent. Place a stripbox (narrow softbox) behind the model diagonally to the camera. The light contour will separate the texture of the hair and shoulder girdle from the background, which is critical when shooting dark clothing in low-contrast locations.
Use of flags (Negative Fill). Place black panels on either side of the model to absorb excess reflections. This method enhances contrast and makes the figure appear slimmer by “cutting” excess light from the side surfaces of the clothing.
After setting up the lighting scenario and completing the shoot, the final correction is performed in photo retouching software. Professional programs like Luminar Neo allow you to locally adjust exposure in deep shadows or reduce overexposure on jewelry while maintaining the natural skin gradient.
Incorporate Props to Enhance Visual Interest
 Props help keep the model's hands busy and give the body the right curves. A regular high chair or concrete cube makes a person sit differently, creating sharp angles characteristic of glossy magazines. Having something to lean on eliminates stiffness, so poses immediately become more confident and natural.
Choose items that contrast with the clothing. Rough stone will perfectly emphasize the delicacy of a silk dress, and transparent glass will add volume to the frame with glare. Just don't overload the space so that the accessory helps reveal the garment's style and does not distract from it.
Use objects in the foreground to create depth. If you place a translucent fabric or the edge of a glass plate close to the lens, soft layers and blurred spots will appear in the frame. This technique complicates the image and focuses attention on the model, creating the feeling of an artistic frame and a candid moment.
Select Backgrounds That Complement Your Fashion Theme
The choice of background in fashion photography determines the professionalism of the final concept. To understand how to shoot fashion photography in practice, start by looking for locations that support the geometry of the image. Use tall verticals—columns, narrow openings, or architectural projections—to visually elongate the model's silhouette.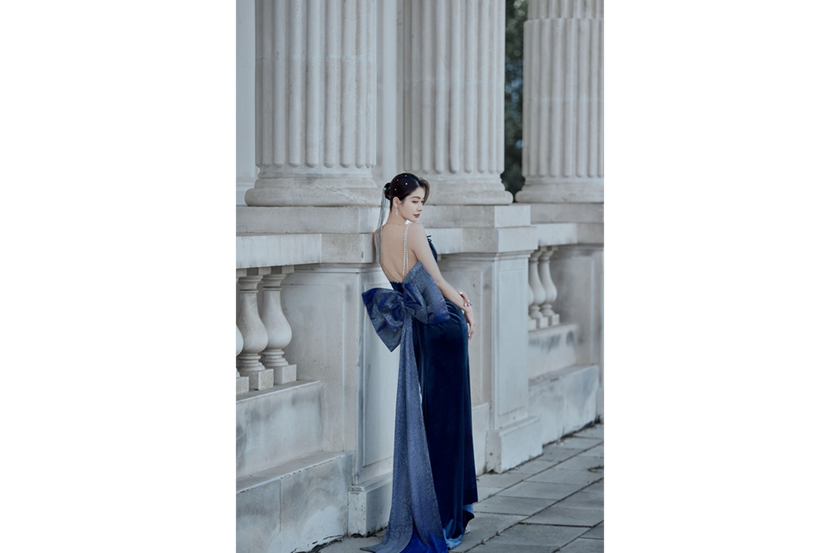
When working outdoors, the approach remains the same: place something large-scale or with textural contrasts in the background. Dunes, rocks, and frozen lakes create a minimalist but emotionally powerful backdrop that works for most ideas. Nature is always natural, so it doesn't distract attention from the model.
To convey the premium nature of the image, work with tonal harmony. For example, dark collections are best photographed on deep graphite or chocolate surfaces: this creates an effect of volume, where the model seems to grow out of the background rather than simply standing in front of it.
Avoid visual noise in the form of colorful signs, graffiti, or objects that look out of place for the chosen location, unless it is part of the overall concept. Using the logic and editing tools described above, you can create a mesmerizing scene even without experience in this style.
Collaborate and Coordinate for a Successful Photoshoot
 The outcome of the shoot depends on preparation, so create a detailed mood board with pose references, lighting diagrams, and fabric textures in advance. Send it to the team some time before the shoot so that they have time to prepare and clearly understand what result needs to be achieved.
During the session, actively manage the process, direct the model, and ask the stylist to adjust details in the frame on time. Once the material has been shot, minor details can be corrected using a photo editor: there is nothing wrong with this for a professional; consider it your third hand.
Mastering the Architecture of Fashion
 Fashion photography sits at the meeting point of technical control and visual storytelling. It demands a clear concept, deliberate lighting choices, and a feel for mood—the details that make an image land emotionally, not just look “correct.” When craft and creative instinct work together, the photographer develops a recognisable style that turns a straightforward shoot into a cohesive aesthetic narrative, highlighting the product, the model, or the central idea.