How to Capture Beautiful Portraits with Natural Light
March 19, 2025

Want to take better portraits? Learn how to use natural light effectively with expert guidance from Steve Roe—no expensive studio gear required!
Nothing compares to the quality, simplicity, and convenience of natural light for portrait photography. While studio lighting can be set up to mimic the effects of natural light, it’s often time-consuming and costly. Natural light, on the other hand, is accessible to both amateurs and professionals, making it a popular choice for creating stunning portraits. The weather also plays a dynamic role, influencing how the light interacts with your model, whether providing soft, flattering light or dramatic contrasts of light and shadow.
In this article, we’ll explore how to use natural light to create beautiful portraits, along with some tips and tricks to help you make the most of your session. Let’s get started!
Why Natural Light is Ideal for Portraits
 High-end studios may have thousands of dollars’ worth of equipment, offering a massive variety of lighting setups to craft the perfect portrait. However, not all photographers have access to such resources, and fortunately, that doesn’t mean we can’t create good portraits.
The beauty of natural light is its accessibility. Even photographers who charge thousands for their work often rely on natural light for their shoots. It offers soft, flattering tones, especially during golden hour, when the sun is lower in the sky.
Just like in a studio, natural light comes in two types: soft and hard. A cloudy day delivers soft light, with the clouds acting like a huge diffuser for the sun, while a bright, sunny day mimics a bare bulb in the studio. Let’s take a closer look at what each type of light offers for your shoots.
Types of Natural Light Explained

Soft Light
Soft light is ideal for capturing smooth skin tones without highlighting blemishes. It’s the most flattering type of light for your model. In fact, beauty shoots often rely on similar soft lighting because of this reason. Keep this in mind depending on the type of shoot you're aiming to do.
Soft Light Weather Conditions
Overcast Days: As mentioned, clouds act as a giant diffuser, making the sun’s light much softer on your model’s features. This lighting is easy to work with and delivers consistent results.
Golden Hour: During sunrise or sunset, the golden hour provides a warm, soft glow that is a favourite among photographers across all genres. Your model will be illuminated with a natural golden hue, and while shadows are present, they’re much softer and more flattering.
Shade: On bright sunny afternoons, if the harsh light is problematic, move into the shade. Ambient light in the shade will illuminate your model softly, offering all the benefits of soft light.
Hard Light
Hard light creates a dramatic contrast between light and shadowed areas, which can result in a very stylised look. It’s perfect for capturing eye-catching compositions, but the drawback is that it can also highlight skin imperfections. You may need to spend extra time in post-processing to retouch these areas.
Exclusive Tools of Endless Possibilities in One AI Editor
Explore Now!Additionally, harsh light can cause your model to squint if they’re directly facing the sun, so be mindful of their positioning, otherwise you can incorporate sunglasses into the look to solve this.
Hard Light Weather Conditions
Midday Sun and Bright Days: Any day with bright, direct sunlight will provide harsh light. While it can be challenging to work with, it’s highly effective for creating dramatic portraits if you’re mindful of the potential pitfalls.
Scattered Clouds: On partly cloudy days, the lighting can shift rapidly as the sun hides and reappears. This inconsistency can be frustrating, and it may leave you and your model waiting for the right moment. If you value consistency in your work, it’s often better to avoid shooting portraits on such days.
Understanding the qualities of natural light and how weather affects it will help you plan your shoot accordingly. Keeping an eye on the weather forecast is essential.
While harsh light can present some challenges, it also offers the potential for stunning results, so don’t shy away from experimenting with it. If you’re new to portrait photography, aim for soft light as it’s much easier to work with and will help you produce fantastic portraits.
Light Positioning for Portraits
 One drawback of natural light is that we must position the model around our light source, the sun, rather than having the freedom to position lights around them as we can in a studio. This may mean that the background of your shot isn’t always ideal if the lighting isn’t favourable in front of a good backdrop.
However, there are still great ways to mimic studio lighting techniques with natural light, and we don’t always need to ensure our model is evenly lit. Creative lighting techniques can offer dramatic effects, resulting in stunning portraits. Let’s take a look at some key lighting positions:
1. Front Lighting
Front lighting offers a well-lit, evenly illuminated model. This technique is similar to a standard beauty shot and can be used on both harsh and soft lighting days. While it provides consistent lighting, the downside is that it can sometimes make the image appear flat. Without contrast, front lighting may lack the depth or inspiration of other techniques.
2. Side Lighting
Side lighting, often used in studios, involves lighting one side of the model while leaving the other in shadow. To achieve this look outdoors, position your model sideways to the sun.
The quality of light, harsh or soft, will affect the shadows and overall drama of the image. Harsh light creates distinct shadows, while soft light offers more subtle shadows. Side lighting, or split lighting, adds contrast, preventing the image from looking flat.
For a cinematic effect, you can shoot from the shadowed side of the face to evoke a moodier, more dramatic feel, a technique often used by cinematographers.
3. Backlighting / Rim Lighting
Backlighting involves placing the sun directly behind the model, creating a“halo effect” around their outline. The hair, face, and body edges are illuminated, while the front of the body remains in shadow. This effect works best in harsh light to accentuate the rim lighting.
However, one downside is that the model’s face may be cast in shadow, leading to potential exposure challenges. Photographers may need to overexpose the background to bring out details in the face.
In such cases, it’s important to strike a balance between illuminating the model’s face and preserving the overall exposure of the image. Later in the article, we’ll explore additional tools that can help manage this issue.
4. Creative Lighting
In studio settings, photographers often place objects in front of bare bulbs to create interesting shadow effects on the model (e.g., palm leaves for a tropical vibe). This creative use of shadowing can be replicated outdoors. Take advantage of natural elements like trees or alleyways with narrow beams of light to add dynamic shadows to your portraits. One technique, called chiaroscuro (the balance of light and dark), was famously used in Renaissance painting. You can use it to keep parts of the face in shadow, highlighting the lit features and adding more drama to your image. This technique can also help create a striking narrative within the frame.
Additional Equipment to Help Fill Shadows
 When shooting outdoors, you want to stay mobile and avoid being weighed down by heavy equipment, especially if you’re moving between locations or working in more remote areas.
Fortunately, there are lightweight, affordable tools that can help you control and enhance natural lighting without compromising on convenience. Here are some essential, easy-to-carry options that can make a big difference in your portrait photography:
Reflectors
As mentioned earlier, balancing the shadowed portions of your model’s face without sacrificing other details can be a challenge. Reflectors are an easy solution.
These lightweight, portable tools bounce sunlight back onto your model, helping to fill in shadows. The closer the reflector is to the model, the more it fills in those shadows, giving you control over the lighting in your shot.
Reflectors also come in different colours, each offering unique effects:
White: Neutral, soft light for subtle fill.
Silver: Bright and reflective, helping to balance stronger highlights.
Gold: Adds warmth to both shadows and highlights, especially perfect for golden hour shots.
While collapsible reflectors are available for easy transport, you can also get creative by using DIY options like white card or even a white wall to reflect light onto your model.
Diffusers: Soften Harsh Sunlight
Just as reflectors help with shadows, diffusers help soften the harsh glare of direct sunlight, creating a more even and flattering light for your model. Portable diffusers are compact and easy to use, but if you're on a budget or don’t have one on hand, you can use DIY alternatives like thin white fabric or even a baking sheet to soften the light.
Stands
If you're working without an assistant, managing a reflector or diffuser while shooting can be tricky. A light stand can solve this problem by holding the reflector or diffuser in place, allowing you to position it perfectly without juggling it with your camera. This can save you time and effort while ensuring your lighting setup remains consistent throughout the shoot.
External Flash
When shooting in lower light conditions, such as during golden hour, you may find that an external flash can help fill in shadows while maintaining control over the amount of light being introduced.
Although it’s not essential, having an external flash gives you more flexibility, particularly when working in challenging lighting conditions.
Post-Procesing Techniques
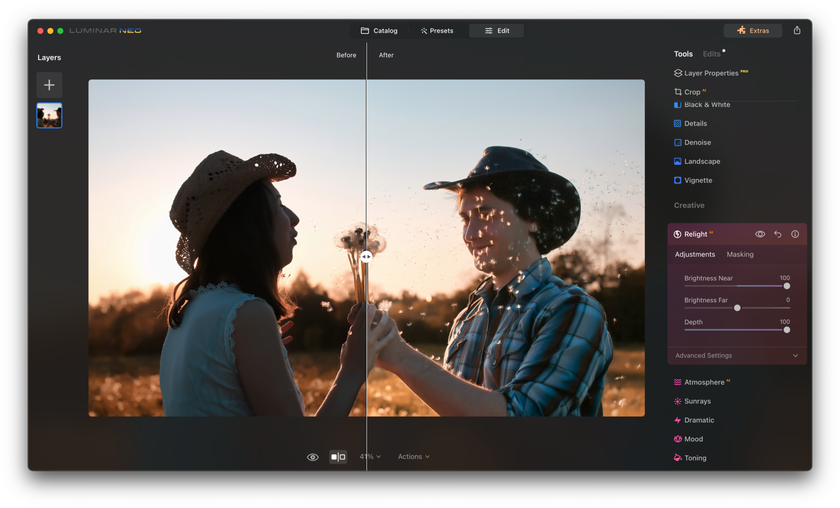
Even with the best lighting setup, some adjustments in post-processing can take your portraits to the next level. Luminar Neo’s Relight AI is one of the best tools I’ve found for fine-tuning light after the shoot.
If shadows are too harsh or the background is too bright, Relight AI lets you selectively adjust brightness and depth, making sure your subject stands out naturally. I’ve used it to balance uneven lighting, add depth to flat images, and subtly enhance golden hour shots. Instead of spending extra time tweaking highlights and shadows manually, this tool does the heavy lifting in just a few clicks.
The Bottom Line
While studios offer the benefit of complete control over lighting, natural light remains a powerful tool for both amateur and professional photographers. It brings a beautiful, organic quality to your images that can be harnessed to create stunning portraits.
Although you can’t control the position of the sun, you can position your model to mimic studio lighting techniques, adding contrast and mood to your shots. Just be cautious when working with shadows, ensuring you don’t overexpose other areas of your image to compensate.
If you find it challenging to balance lighting, consider using tools like reflectors to fill in shadowed areas. Most importantly, have fun shooting outdoors, natural light will help you create fantastic portraits, enjoy!