What Are Leading Lines in Photography?
Last Updated on September 24, 2025
For photographers, leading lines photography is one of the simplest tricks to add instant impact. In this article, you’ll learn how to use them effectively.
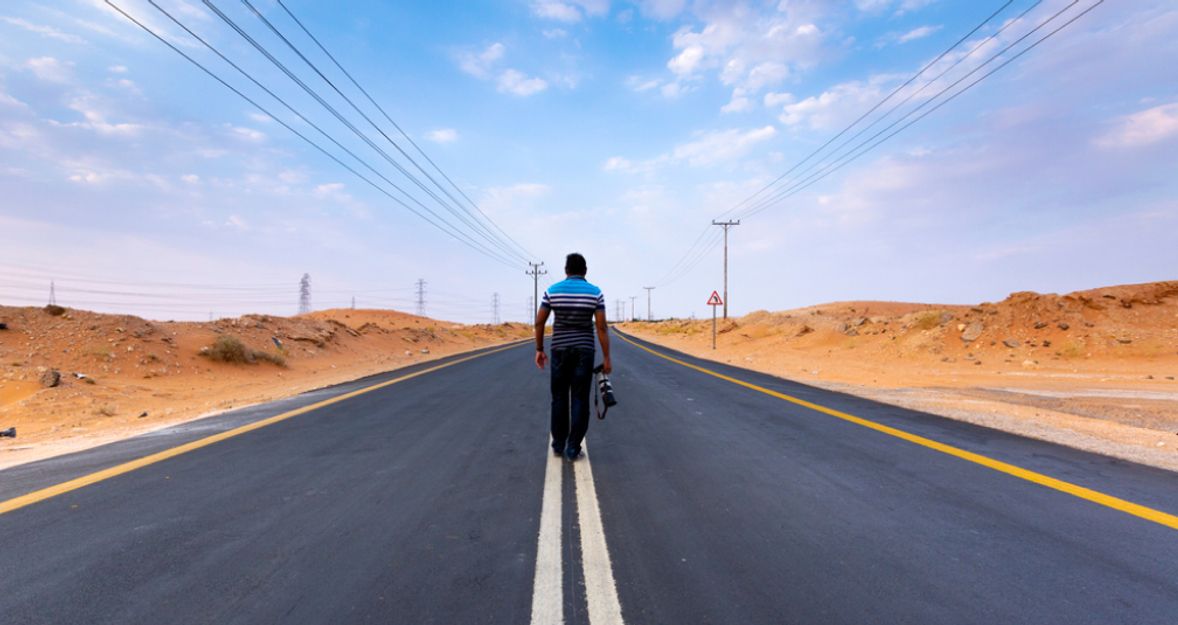
Leading lines are visual paths in an image that guide the viewer’s eye toward a subject or through the frame. They can be literal: a road, a fence, a row of trees or subtle, like the edge of a shadow or the repetition of window frames.
Examples include a winding mountain road that pulls the gaze into the distance, railway tracks converging at the horizon, rows of street lamps marching into the frame, and even the line created by a model’s extended arm.
In this guide, we’ll explore leading lines photography, showing how they draw attention, add depth, and turn ordinary shots into striking images.
Why Are Leading Lines Important in Photography?
 Leading lines shape how an image is read. They add control and intention to composition, turning random scenes into purposeful pictures. Plus, they help make simple scenes clearer and stronger.
Here are a few key ways leading lines enhance your photos:
- Directing the Viewer’s Eye: Lines direct attention. A strong line can pull the eye from the foreground to the subject, or from one corner to another, making the intended focal point obvious without heavy editing. Shooting a leading lines photo helps guide the viewer’s eye through the frame with purpose.
- Adding Depth and Dimension: Lines show distance: as parallel lines draw toward the horizon, they open up the scene and turn a flat picture into one that feels spatial and deep.
- Creating Balance and Harmony: Lines can balance heavy elements. A vertical line might counter a diagonal line on one side and produce harmony on the other. Using lines deliberately keeps the composition stable rather than chaotic.
Types of Leading Lines in Photography
Photography leading lines come in many shapes and styles. Knowing which type is present helps choose the best camera position and framing.
Horizontal Leading Lines
 Horizontal lines are calming and stable. A low beach or long wall across the frame stabilizes the composition and creates tranquility. Use them in landscapes, scenes of the sea, and portraits that demand tranquility.
Vertical Leading Lines
 Verticals read as strong and formal. Columns, lamp posts, and tall trees draw the eye upward and emphasize height. Place a subject beside a vertical line when a poised, statuesque look is wanted.
Diagonal Leading Lines
 Diagonals bring energy and motion to a frame. Roof edges, slanted streets, or long shadows push the eye through the scene and add tension. They work great for action shots or any still where movement is needed.
Curved Leading Lines
 Curves feel natural and inviting. A river bend, winding path, or spiral staircase leads the viewer on a gentle visual journey. Curved lines are especially effective in environmental portraits and storytelling landscapes.
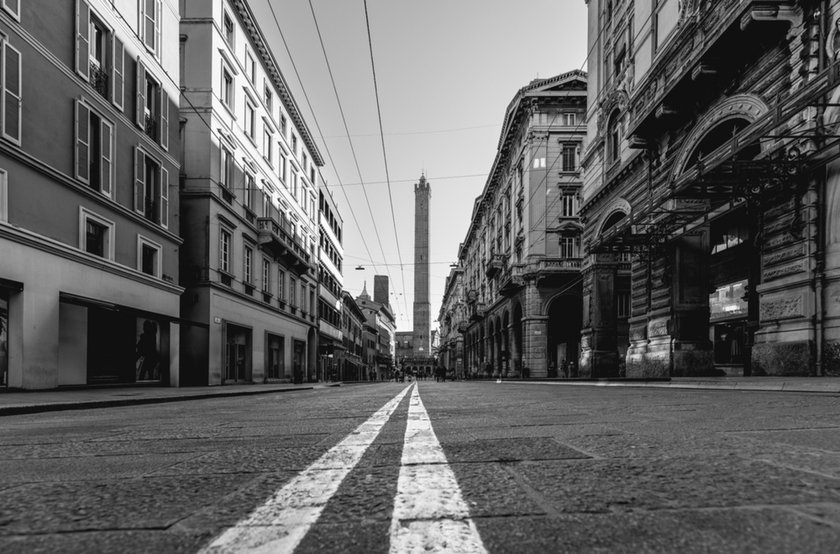
Converging Leading Lines
 Lines that converge often meet on the horizon, giving a strong sense of depth. Train tracks or long hallways naturally draw the eye. Position your subject at or slightly before this meeting point to create a dramatic perspective.
Exploring line photography techniques can inspire and show how professionals use lines to guide the viewer’s attention.
Implied Leading Lines
 Implied lines don’t physically exist but are created by alignment, hands pointing, eye gaze, or a sequence of objects. These are subtle and powerful in editorial and portrait photography.
Intersecting Leading Lines
 When lines cross, they create points of tension or emphasis. Streets that meet, grids of windows, or crisscrossing shadows can highlight the subject or add drama. Use intersecting lines to frame key elements or to give your photo a sense of complexity and structure.
An Array of Professional Photo Filters to Elevate Your Images
DiscoverHow to Use Leading Lines in Photography
Using lines is a step-by-step craft. The method below turns observation into intention. Start by seeing lines as tools, then shape camera placement and subject position to make those tools work.
The steps below show how to make lines work with intention.
Step 1: Identifying Leading Lines in Your Scene
Scan the frame before shooting. Look for edges, textures, shadows, and repetition that form a path. Curbs and crosswalk patterns are gold for street work, and window rows and soffits form instant lines in architecture. A well-composed photo with leading lines immediately draws the viewer’s eye to the subject while creating a sense of depth.
For example:
Foreground edges that lead inward
Repetition that suggests direction
Shadows or light bands that trace paths


Step 2: Positioning Your Subject
Place your subject where lines are converging on it or passing through its area. Putting them off-center where lines intersect gives tension and focus. Avoid placing the subject at a busy intersection where many lines battle for attention.
Step 3: Experimenting with Perspective
Move up, down, or sideways. Lowering the camera can lengthen foreground lines and increase depth. Climbing higher can turn lines into patterns. A wide-angle lens exaggerates the distance between near and far points; a telephoto compresses lines and brings distant convergences closer.
Practical settings for dramatic lines:
Aperture f/8–f/11 for sharp landscapes and architecture
Use a tripod for precise low-angle shots
Wide-angle (16–35mm) to emphasize foreground leading lines

Step 4: Editing to Emphasize Leading Lines
In post-production, the goal is to make existing lines stand out, not to create new ones. Start by enhancing contrast along the lines, darkening distractions, and sharpening edges that should feel crisp. Cropping is also a simple way to remove stray elements that interrupt the visual flow.
For faster results on a laptop, a dedicated photo editor for PC makes local adjustments quick and efficient. In Luminar Neo, tools like Structure AI and Accent AI bring out midtone details along the lines, making them pop naturally. With just a few clicks, you can boost local contrast, clean up distractions, and emphasize edges without overdoing it.
Finally, use local masks to brighten your subject while keeping the leading lines intact for balance. Once the main edits are complete, finishing touches in apps for photo editing for Instagram can subtly refine colors, contrast, and sharpness — ensuring your leading lines guide the viewer’s eye smoothly when sharing your work online.
Common Mistakes to Avoid with Leading Lines Photography
Lines can make a big difference, but they lose power if used carelessly. Use these pointers to keep your compositions sharp and meaningful.
Overusing Leading Lines in Photos: If several forceful lines contend with each other, the eye is pulled in several directions, and the sight loses a clear point of focus. Select one dominant line to guide the eye, and let subsidiary lines play a quiet supporting part.
Misaligned Subject Placement: Placing the subject right on a busy junction or dead center at the vanishing point can flatten the image; shift it slightly before the convergence so the eye lands naturally.
Ignoring Background Distractions: Clutter in the background breaks the line’s flow. Remove poles, trash, or signs interrupting the path, or fix them in post with cloning or a gentle blur when retakes aren’t possible.
Tips for Finding and Capturing Photos with Leading Lines
Finding lines becomes easier with practice. Use a plan and everyday observation to train the eye. A short routine helps produce consistent images.
Tip 1: Plan Your Shots
 Scout locations for paths and edges. Early morning light often creates long, dramatic shadows as temporary leading lines. Study how puddles or wet streets reflect lines after rain for urban scenes.
For those looking to spot dynamic lines in busy urban scenes, learning from tutorials on street photography can help capture paths and edges more effectively.
Tip 2: Use Wide-Angle Lenses for Depth
 Wide lenses emphasize the distance between foreground and background. That exaggeration makes lines feel longer and subjects pop against far-off convergence.
Tip 3: Incorporate Multiple Leading Lines
 When two or more lines meet just behind the subject, they act like a natural spotlight. Position the subject so the intersection sits slightly behind or beside them; it adds drama without competing for attention. This trick works especially well for portraits and product shots because the crossing lines pull the eye straight to the subject.
Tip 4: Practice with Everyday Scenes
 Ordinary places are some of the best spots to train your eye. Notice the repeating edges of sidewalk tiles, the seams on a kitchen counter, or the rows of books on a shelf. Shoot the same scene from different heights and angles, even small changes in camera position can turn a subtle line into a strong compositional tool. Paying attention to leading lines in a photo can help you see paths you might otherwise overlook, making even simple scenes visually compelling.
Leading Lines vs Paths: Key Differences
Understanding the difference between leading lines and paths helps you control where the viewer’s eye goes in your photo.
Leading Lines: Focus on composition. They guide the viewer’s eye through the image, as if you could physically walk along them. Examples include shadows, rows of chairs, fences, or light streaks.


Paths: Actual walkable routes in the scene. Paths can act as leading lines, but their primary identity is physical. Examples include sidewalks, trails, or roads.


Tip: Not all lines are paths, and not all paths are lines. Recognizing the difference helps you decide whether to emphasize your photo’s physical trail or visual flow.
Key Takeaways
Lighting and settings make lines readable. Side light brings texture and shadow, often creating the strongest implied lines. For sharper lines, use moderate apertures, stable support, and mindful placement of the subject relative to the visual path. Compose so the line tells a clear story and the subject becomes the natural destination.
FAQ
Do leading lines always have to be straight?
No. Curved and implied lines are equally effective. A meandering river or a flow of footsteps can be softer but as compelling as straight lines.
What is an example of a leading line in photography?
A railway track that runs from the foreground into the distance is a classic example. It converges toward the horizon and naturally draws attention.
How to incorporate leading lines into a photograph?
Find the most dominant line in your scene, place your subject along it, and pick an angle that enhances its visual impact. Even slight changes in perspective can transform everyday elements into compelling guides.
What is the leading line rule in photography?
The rule encourages using one or more lines in the frame to direct attention, usually toward the main subject or into the scene to create depth. It’s flexible; treat it as a guiding principle rather than a strict law.
What are leading lines in photography?
Leading lines are compositional elements that guide the viewer’s eye through an image toward a focal point. They can be literal objects, shadows, or implied directions formed by gaze or arrangement.