Types Of Old Photo Damage That Can Be Restored With AI
November 06, 2025

Discover the most common types of old photo damage—fading, scratches, stains, tears, and water marks—and learn how AI photo restoration tools can bring them back to life quickly and realistically.
Old prints don’t just “go bad” the same way. Silver-based photos can grow a metallic sheen, color snapshots fade toward magenta, and a flood can glue a cherished portrait to the frame. Good news: most issues have a name, a cause, and a realistic path to recovery.
Below is a practical guide for photographers (and families) that maps the most common problems to modern fixes—including where AI speeds things up—with plain language and zero mystery.
First things first: can damaged photos be repaired?
In many cases, yes. Conservators and archives note that deterioration is expected over decades, but thoughtful treatment and reformatting (scanning) can stabilize or recover a surprising amount of detail. Mechanical damage (tears, creases), chemical change (fading, yellowing), and biological issues (mold) are all documented—and treatable to different degrees—in museum guidance.
The Library of Congress and national conservation institutes outline these categories and why they happen, from temperature/humidity to poor enclosures and processing residues.
The landscape of deterioration
 When people search for types of old photos, they often mean daguerreotypes vs. tintypes vs. gelatin silver. For restoration, it’s more useful to think in damage types across processes:
Physical: tears, cracks, abrasions, curling, stuck-to-glass prints.
Chemical: yellowing, fading dyes, silver oxidation, “silver mirroring.”
Biological: mold, foxing-like stains after high humidity or floods.
Each bucket has a different risk, but the patterns are consistent across collections, guidance from LoC, NEDCC, and conservation wikis.
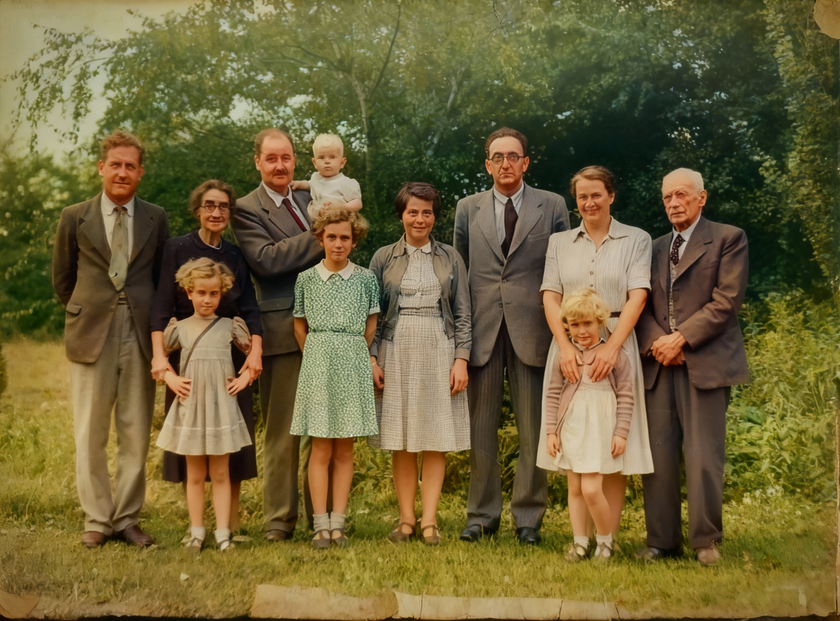
Old damaged photograph: what you’re actually seeing
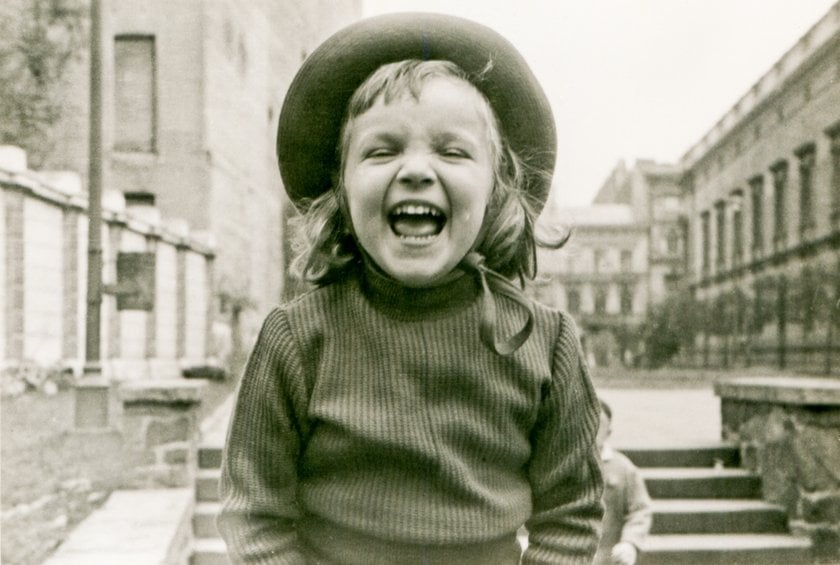
 Creases, tears, and edge loss. These are classic handling problems. They scan surprisingly well; high-resolution capture plus digital inpainting can reconstruct fibers and paper grain. Conservators physically mend only when needed for display; for most families, a high-quality scan and digital retouch is safer.
Silver mirroring on B&W gelatin prints. That cool-colored, mirror-like sheen around dense shadow areas? It’s a chemical oxidation product of silver that migrates to the surface—common on mid-century prints stored in humid conditions. You can’t “wipe it off” without risk; the right approach is careful digitization with raking-light control, followed by digital correction of contrast and tone to neutralize its effect.
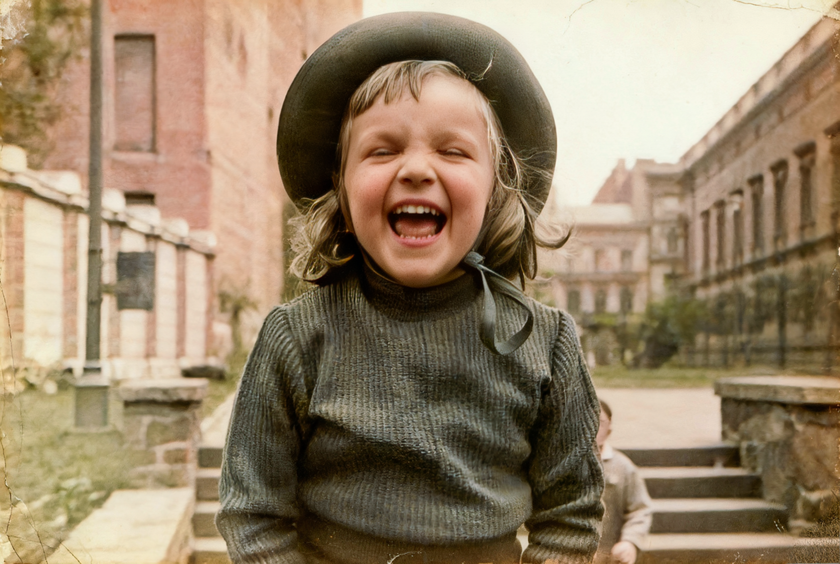
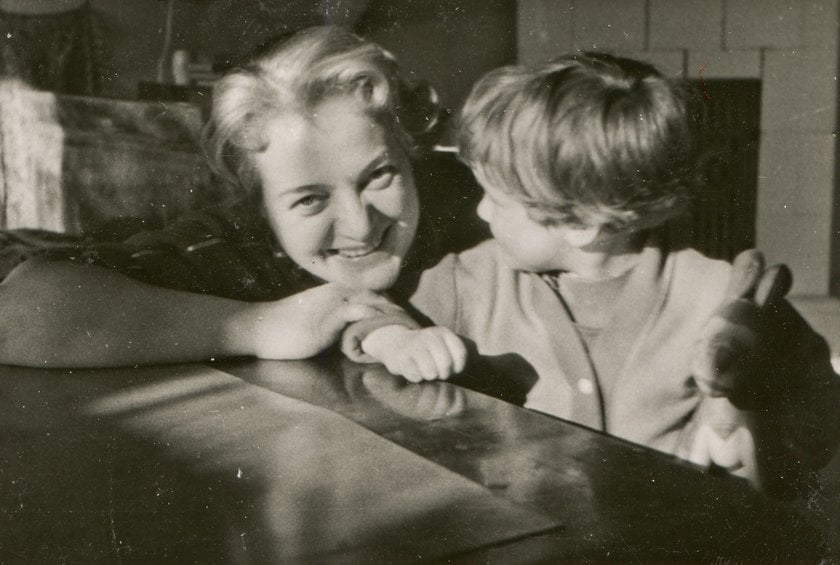
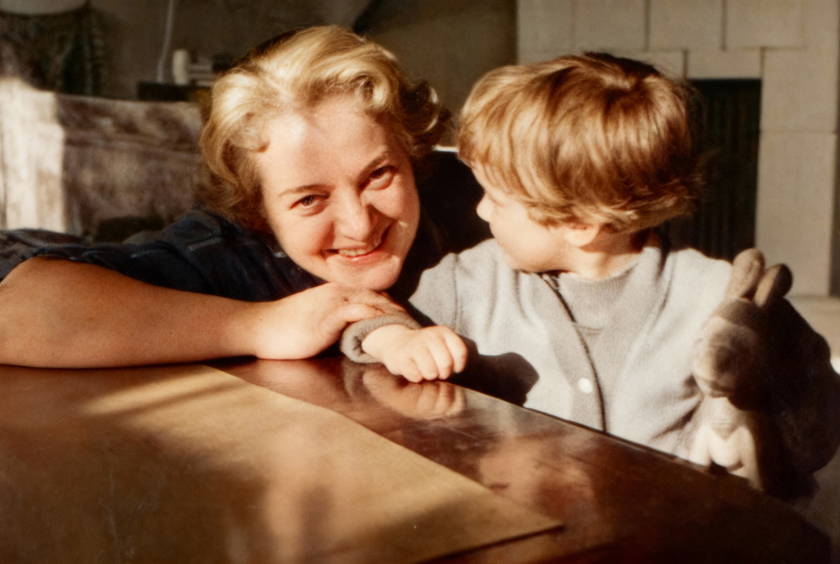
Damaged vintage photos in color. Chromogenic prints from the 1960s to the 1990s fade as the dye layers age, often with a magenta or yellow cast and flattened contrast. Capture all the remaining information first, then digitally rebuild neutrals and skin tones rather than pushing the original print further through chemicals.
Water damage photos. After leaks or floods, emulsions can block the glass, wrinkle (“cockle”), or pick up tidemarks and mold. Conservation guidance stresses air-drying protocols and minimal intervention before scanning; once digitized, stains and planar distortions are prime candidates for software-based cleanup.
Film base decay (negatives). Nitrate and acetate negatives can turn sticky, smell like vinegar, and eventually powder; when that happens, digitization becomes urgent because information loss can be total. If a print exists, but the negative is failing, treat the print like the “master” and restore from it.
Where AI belongs in a restoration workflow
State-of-the-art research and practice point to a staged flow: damage removal—denoise/dering—facial or texture restoration—color rebuild. Human judgment stays in the loop—you approve each pass and avoid the “plastic” look. Diffusion and transformer models now handle cracks/holes, boost resolution, and reconstruct faces with fewer artifacts than older tools, especially when used in small, targeted amounts.
If you’re experimenting, start with gentle global improvement and only then retouch locally. A light pass with an AI image enhancer can establish a clean baseline before you touch the fine details; used mid-pipeline, this kind of step helps balance tone and contrast without overcooking highlights.
Elevate Your Photography with Our Advanced Software
Discover PricingPractical, photo-by-photo triage
Scan once, scan well. Even if you’ll do the heavy lifting digitally, quality capture matters: clean glass, perpendicular camera, and enough resolution that a 1:1 crop shows grain, not pixels. As NEDCC and LoC note, better scans reduce later artifacts and preserve what little density remains in shadows and highlights.
Stabilize color and contrast. Set a neutral point, re-separate shadows/mids/highlights, and fix WB drifts from aging dyes. This improves every subsequent step, especially de-staining and inpainting.
Fill losses and mend tears digitally. Targeted inpainting beats blanket blur. Around edges, clone in grain direction; across faces, switch to smaller, noise-aware brushes to avoid “wax.”
Rebuild resolution wisely if you must reprint big, upscale after repairs, so the model has clean edges to honor. Modern image upscaler AI tools are good at doubling the size without jaggies when fed a tidy source.
Finish with an archival-looking grade. Avoid over-saturation or “HDR” contrast on century-old images; keep paper white believable and preserve quiet midtones that feel like fiber prints, as conservation references emphasize.
How to restore old photos using AI
When you reach the cosmetic stage, fine retouching still matters. If you prefer a hands-on pass after AI, a traditional retouching photos workflow keeps control where you need it most — dust, fibers, and the last 5% that separates a fix from a keeper.
Global cleanup. Run a conservative enhance/denoise to reduce scanner grain and minor blotches, then check edges and text. AI excels here because it can equalize micro-contrast without ruining paper texture.
Cracks and holes. Use automated scratch/spot removal in passes, reviewing after each. Algorithms trained on real damage tend to respect boundaries, but you’ll still hand-paint around typography, eyes, and hairlines.
Faces and fabrics. Modern face restorers can recover eyes and lips from low-res sources; keep the strength low and compare against the original so you don’t “rewrite” a person’s features.
Color rebuild. For 1970s prints, rebuild neutrals before boosting saturation. In diffusion-based tools, small steps beat a single aggressive transform.
And if you don’t want to have problems with post-processing photos or how to restore old photo using AI, pay attention to Luminar Neo. With the help of built-in AI at its core, your photos will turn into a work of art.
First, we outlined the multistep AI route that mixes several tools. Next we’ll show a way to do the same almost “in two clicks,” and we’ll reflect that in the heading.
One-Step Restoration in Luminar Neo, the “two-click” route
Luminar Neo now includes a Restoration tool designed for quick cleanup of aged or damaged photos. It analyzes the scan, suppresses scratches and specks, evens out blotchy tone, and gently restores contrast and faded color so you get a clean base before any fine retouch. The control is straightforward: open the scan, apply Restoration, then adjust the amount until defects fade while texture still looks like paper rather than plastic. If parts of the image don’t need repair, reveal them with the mask, so the algorithm works only where damage exists.
After the pass, give the picture a short sanity check. If tiny defects remain, run a lighter second pass on just those areas, then finalize with your usual tonal tweaks—a touch of exposure and white balance to settle neutrals, maybe a small clarity lift on edges. Keep the grain consistent by adding a subtle, uniform texture if a repaired patch looks too clean. Used this way, Restoration becomes a fast foundation: it removes the heavy lifting in seconds, and you keep creative control for the last five percent.
Yellowing, fading, and stains—what to fix digitally, what to accept
Color casts in old resin-coated and chromogenic prints aren’t just “bad white balance”; they’re dye-layer shifts. Conservation sources confirm that heat and humidity speed these changes, which is why your attic photos skew warm. Digitally, work neutrals first, then skin; chasing a perfect paper white can erase period character. If a family set went uniformly yellow, here’s how to edit a yellowish photo you can keep handy when you move from theory to a specific file.
Save Your Old Memories with Photo Restoration
Try it for freeWater, mold, and stuck-to-glass disasters: realistic expectations
After a flood, emulsions can block the glazing or adjacent prints; pulling them apart risks skinning the image layer. Archives recommend careful air-drying and reformatting before any digital work. Once scanned (even if partly stuck), tide lines, foxing-like blooms, and planar distortion respond well to local curves and inpainting.
If you’re documenting water damage photos for insurance, capture the state first, then restore. And if the only surviving artifact is a low-res phone snapshot of a damaged print, prioritize geometry correction and grain-matched inpainting before upscaling.
How to repair damaged photos
 Treat texture: paper grain, halation, and gentle silver noise are part of the photograph. Blend your patches with noise that matches the original; reduce contrast in repaired areas so they “sit” in the print. If you need to combine a torn corner from another scan or reconstruct a missing background, compositing tools with controlled opacity help you remaster a picture without introducing modern plasticity. Maintain a layered file so that changes can be easily reversed.
What about negatives—and can old pictures be restored if the original is gone?
If the negative is stable, it’s the best source for detail. For nitrate/acetate issues (vinegar smell, stickiness), archivists warn that decay can accelerate and result in total image loss; copy now and restore digitally later. If you only have a photocopy or a tiny web image, AI can still clean, denoise, and upscale within reason, but set expectations: you’re rebuilding plausibility, not manufacturing forensic truth.
Tooling up: a pragmatic stack that respects history
You don’t need a lab—you need a repeatable path. Begin with a careful, glare-free scan, set a neutral baseline, mend tears and stains with targeted retouching, and keep a layered master, so every step stays reversible. If the sequence feels fuzzy, think in the same stages professionals follow for how to restore old photos—stabilize, digitize cleanly, correct tone, repair locally, then resize—an order that preserves texture and keeps results believable.
Negatives, copies, and expectations
 Negatives are often the best source—unless the plastic base is chemically unstable, in which case copying them sooner is wise. If all you have is a thumbnail or photocopy, AI can clean and enlarge within reason, but it cannot invent forensic truth. That’s the plain answer to can old pictures be restored: usually to a respectful, plausible version that reads well at normal viewing distances.
Old photographs carry both history and craft. With a careful scan, a small set of steady steps, and modern AI used like a scalpel, you can bring them back in a way that looks right, feels honest, and will still make sense to the next person who opens the box.
The bottom line—fix more, guess less
How to remaster a picture? Most problems that look terminal are cataloged and manageable. Stabilize the object, digitize carefully, use AI as a scalpel rather than a sledgehammer, and finish by hand where it matters. With that mix, damaged photos can be repaired, eliminating the worry and allowing you to create a repeatable workflow—one that respects the look and feel of the original print while making it ready for another generation.