Double Exposure: Exploring the Art of Layered Realities
February 06, 2025
Discover the creative world of double exposure photography! Learn how to blend images, experiment with layered compositions, and create surreal, artistic visuals.
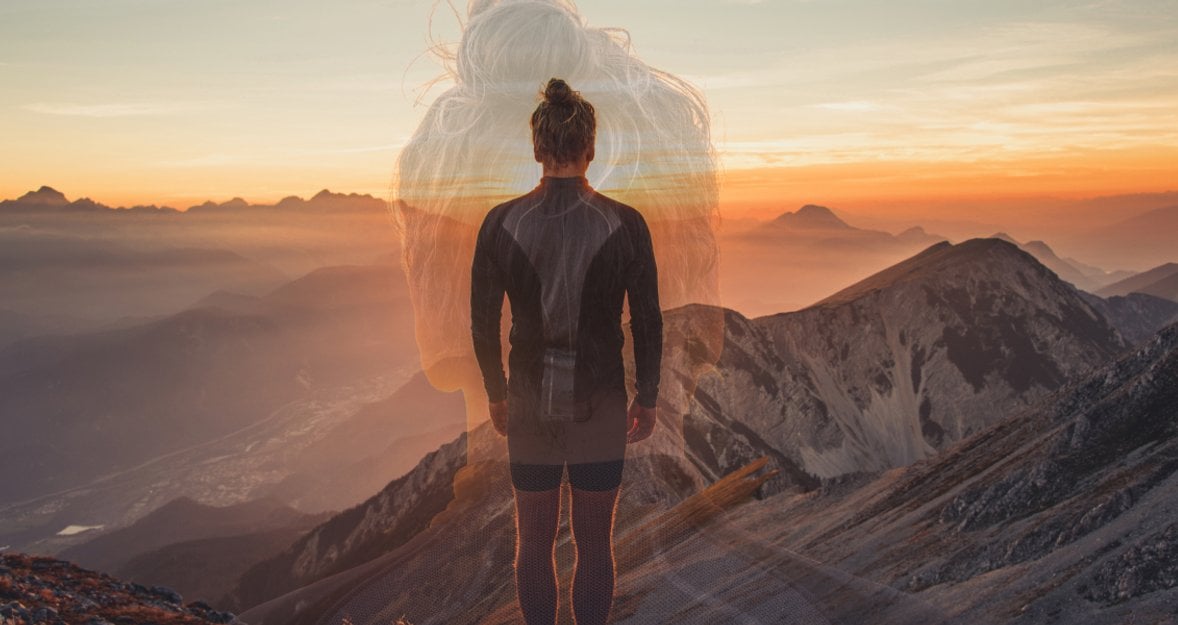
Double exposure is a photography technique that combines two images to create a single picture. This creates interesting and unique artistic effects that tell a story.
In this blog, we'll explore the techniques used in double exposure, its history, and the creative possibilities it offers. We'll also look at how you can create your own layered images and the artistic ways you can use this technique to make unique and captivating photos.
What is Double Exposure in Photography
In the early days of film photography, double exposure occurred when photographers accidentally or intentionally exposed the same piece of film twice, creating a single image with two overlapping scenes. These experiments were often done to create artistic effects or to save film, and they quickly became a popular way to make photos look more creative and unique.
Notable photographers like Man Ray and Jerry Uelsmann made double exposure famous with their imaginative and surreal images. Man Ray used this technique to create dreamlike portraits and abstract art. Jerry Uelsmann layered multiple exposures to produce intricate and surreal landscapes. Their work showed how double exposure could transform ordinary photos into stunning pieces of art.
With the rise of digital photography, double exposure became easier and more precise. Photographers could now blend images using editing software which allowed more creative freedom, as they could experiment with multiple exposures, adjust each layer, and make changes without the limitations of traditional film.

The Art and Technique
In traditional film photography, double exposure was achieved by exposing the same piece of film twice. Photographers would either take two shots without advancing the film or use a special camera setting that allowed multiple exposures. This required both images to align in a creative way. Often, photographers would experiment with different subjects or scenes, hoping to create unique, artistic results by blending the exposures on one frame. This technique was unpredictable, adding an element of surprise to the results.
The challenge with manual double exposure was that it was hard to control the final result. Since everything was done on film, photographers had to rely on timing and luck. If the exposures didn't line up perfectly, or if the lighting wasn't right, the image could turn out blurry or unclear.
What about Digital Methods
With digital photography, creating double exposure has become much easier using software tools like Luminar Neo. These programs let you combine multiple images on your computer, adjusting things like opacity, blending modes, and positioning. You can control every detail, making it easier to achieve the perfect layered effect. Unlike film, you can experiment without worrying about wasting film, giving you endless possibilities to create unique and striking double-exposure images.
Many modern cameras have an in-camera double exposure setting, which allows you to combine two images in one shot. To use this feature, select the double exposure mode in your camera's settings. The camera will automatically layer two exposures, usually with a slight transparency so that you can see both images. You can control the exposure for each shot and decide how the images blend together. This method allows you to create double exposure effects without needing any software.

Creative Possibilities
Themes and Concepts
Double exposure is a technique used for creating surrealism and dreamscapes in photography. It's a way to visually express complex emotions or imaginary worlds that wouldn't be possible in a single photo.
Double exposure is often used to blend nature, portraits, and urban scenes. For example, a double-exposure portrait might be combined with natural elements like trees or mountains to symbolize a connection to the environment or inner self. Urban scenes, such as city skylines, can be layered over portraits to express the relationship between people and the fast-paced world around them.
Composition Tips
Creating a compelling double-exposure image goes beyond simply layering two photos—it requires careful composition to ensure the elements blend seamlessly. From balancing light and shadow to selecting the right subjects, these tips will help you craft visually striking and meaningful double exposures.
1. Balance Light and Shadow for a Natural Blend
Balancing light and shadow is key to creating a double-exposure image. When layering two photos, ensure the lighting in both images complements each other. The result may look chaotic if one image is very bright and the other dark. To help the images blend naturally, aim for a balance where the shadows in one image fill in or highlight the light areas in the other.
2. Choose Subjects That Complement Each Other
When selecting subjects for double exposure, choose images that complement each other in shape, contrast, and meaning. For portraits, look for subjects with interesting features, like strong outlines or textures, that can blend well with other images. Nature and urban scenes work well because they provide texture, patterns, and depth that can mesh with a person's silhouette or other objects. Consider the story or emotion you want to convey—whether it's a peaceful connection with nature or a busy, energetic city scene—and select subjects that help communicate that message.
3. Use Textures and Patterns to Add Depth
Combining different textures and patterns is a great way to create contrast and add an artistic touch to the image. For example, a portrait can be layered with a textured background like clouds, leaves, or fabric to create a unique effect where the texture interacts with the subject. Patterns, like the lines of a cityscape or the ripples on water, can fill empty spaces.

Practical Advice for Beginners
Choosing the Right Setup and Gear
To create double exposure, you'll need a camera (DSLR, mirrorless, or even a smartphone with double exposure settings), a tripod for stability, and a few subjects to photograph. Natural light works well for beginners, but you can experiment with artificial lighting too.
If you're using a digital camera, start with the in-camera double exposure feature, which automatically blends two shots for you. If you're editing photos afterwards, a camera with high resolution is helpful for better details in your final images.
For double exposure, photo editor like Luminar Neo can be used to layer and adjust the images. A basic understanding of layers and blending modes in these programs will allow you to experiment and fine-tune your double exposures.
Step-by-Step Double Exposure Tutorial
To create a double-exposure image, follow these steps:
Step 1: Choose Your Subjects
Pick two images you want to combine. For a portrait, consider using a person's face and a nature scene or a cityscape for an urban aesthetic.
Step 2: Capture the Photos
Take well-composed shots, using a tripod for sharp, clear images—especially if you plan to blend them later.
Step 3: Edit in Luminar Neo
Open and Layer Your Images: Start by opening your base image (e.g., the portrait) and add your second image (e.g., the nature scene) as a new layer on top of the first.
Adjust the Opacity: Lower the opacity of the top image so you can see both layers, line them up, and see how they blend together.
Blend the Images: Change the blending mode of the top image to something like “Overlay” or “Screen” to allow both images to merge smoothly. Experiment with different modes to see which one creates the best effect.
Refine the Composition: Position and scale the second image until it fits well over the first. If necessary, use layer masks to erase parts of the top image to reveal more of the bottom image.
Fine-tune Details: Adjust brightness, contrast, and shadows to make the final result cohesive. Play with color tones to enhance the mood of the image.
Save and Share: Once you're happy with your double exposure, save your image. Now it's ready to share!
How to Avoid Common Mistakes
Here are some common mistakes to avoid and troubleshooting tips for creating double-exposure images:
1. Unbalanced Lighting
If the lighting in the two images doesn't match, the final result can look disconnected.
Tip: Try to choose images with similar lighting or adjust the exposure of one or both images to balance them before combining them.
2. Overlapping Details
Sometimes, the elements in both images may clash or become too busy, making the final image confusing.
Tip: Use layer masks to hide parts of the second image that don't work well or distract from the main subject.
3. Poor Image Alignment
If the images don't align properly, they may look messy or out of place.
Tip: Use grids or guides in your editing software to help align the images. Consider positioning elements that naturally fit together, like faces or objects.
4. Too Much Opacity
If the second image is too opaque, it can overwhelm the first one.
Tip: Lower the opacity of the second layer and experiment with blending modes like “Overlay” or “Soft Light” to create a more subtle effect.
5. Lack of Contrast
Without enough contrast, the two images may blend too much, making the final result hard to distinguish.
Tip: Adjust the contrast, brightness, or shadows so both images are visible, and the details stand out.
6. Over-Editing
Over-editing can make the image look unnatural or overdone.
Tip: Keep your adjustments subtle. Start with small changes and gradually build up the effect rather than making dramatic edits all at once.

Double Exposure Ideas: Advanced Techniques
1. Multi-Layered Exposure
Multi-layered exposure combines more than two images to create a more detailed composition. It requires careful planning and control over the opacity and blending of each layer to avoid clutter and ensure the final result is balanced and visually appealing. This technique allows for endless creative possibilities and truly unique, layered visuals.
2. Blending Modes and Opacity Adjustments
Blending modes and opacity adjustments are powerful tools in editing software for creating smooth and creative double exposures.
Blending Modes
These control how two layers interact with each other. Common modes for double exposure include:
Overlay: Combines light and dark areas from both images for a contrast boost.
Soft Light: Adds a subtle, gentle effect by blending the layers softly.
Screen: Lightens the images and blends them in a dreamy, airy way.
Multiply: Darkens the combined images, perfect for moody or dramatic effects.
Opacity Adjustments
Opacity controls the transparency of a layer. Lowering the opacity of the top layer makes it more see-through, allowing the bottom layer to show through. Adjusting opacity helps you balance how much of each image is visible and creates a more harmonious blend.
By experimenting with different blending modes and opacity levels, you can control the mood and depth of your double exposure.
Motion And Time-Lapse
Incorporating motion and time-lapse in double exposure adds dynamic elements to your images, creating a sense of movement and storytelling. You can blend static images with motion captures, like a person walking or traffic moving, giving the final composition an energy that feels alive.
For time-lapse, you can layer several shots taken over time, such as the changing sky or city lights at night, to show progression within the same frame.
When incorporating motion, make sure the movement complements the still elements, and use opacity or blur effects to smooth transitions.
The Bottom Line
Double exposure is a photography technique that blends two images into one using traditional film or modern digital tools. You can create unique images by experimenting with composition, lighting, and subjects.
As a beginner, start with simple setups and continue to more advanced techniques like multi-layered exposures and motion blending. With practice, you'll be able to develop your style and use double exposure to tell captivating stories through your photos.