How To Change HEIC To JPG On Mac Without Any Hassle
November 03, 2025

Want to open HEIC files on your Mac? Here’s how to turn HEIC into JPG quickly and keep image quality and EXIF data intact.
Why do we all enjoy things with the Apple logo? Of course, it's the case design and the high-pixel camera, which have long competed with imaging devices. Using an iPhone or MacBook for editing allows photographers to retain consistent color palettes, preserve EXIF data, and prevent photo loss through iCloud. However, with the introduction of HEIC, everything changed, and the file conversion matter has been handled for more than five years. How to turn HEIC to JPG on Mac? We'll explain in detail in this article.
The Basics of Changing HEIC to JPG on Mac
 Nobody likes installing unrelated apps on their phone. Apple has always catered to its users' needs, including a built-in MacBook photo editor. However, it's not enough for high-quality operations. If you want to convert HEIC to JPG on a MacBook or iPhone, you should know some basic information. Let's talk about it right now.
What image file types on macOS are acceptable?
 macOS is demanding of its photographic users. To view pictures on your device, simply choose a file in Finder and open its properties using the context menu. Then, navigate to the "Open" area of the application, select the desired program from the list, and click "Configure."
Following that, all files with the given extension will open in the chosen environment. Apple's operating system comes with a Photos application. However, utilizing this tool as your primary photo viewer is tedious. Don't forget that when working with images, you'll need to repeat this procedure for all file types you work with:
JPG;
JPEG;
PNG;
GIF;
GIMP, etc.
Individuals have praised the camera quality of iPhones and iPads, while others have also singled out their limitations. As a result, it was necessary to download Pixel or a comparable app from the App Store.
Much has changed since the release of iOS 11, namely the introduction of HEVC video encoding. HEIC files can include several photos, making them compatible with Apple's Live Photo feature. These files incorporate image editing information, such as rotation and cropping, which allows the user to reverse modifications later. How to make HEIC to JPG on Mac? We will talk about it soon.
Features of HEIC
 Photographers who decide to optimize their workflow on macOS will be astonished by a new photo format. HEIC initially appeared on the iPhone 7 running iOS 11 in 2017. Its primary advantage is its modest weight. In comparison to JPG, the ratio is 2:1. Simply put, two HEIC photos are comparable to a single JPG.
Along with transparency and the capacity to store multiple images, HEIC can handle 16-bit color. In opposition, JPG images can only handle an 8-bit palette. May you edit HEIC files on an iPhone? You can additionally work with built-in software and stop saving photographs in HEIC on your iOS 11 device by navigating to Settings > Camera > Formats > Most Compatible.
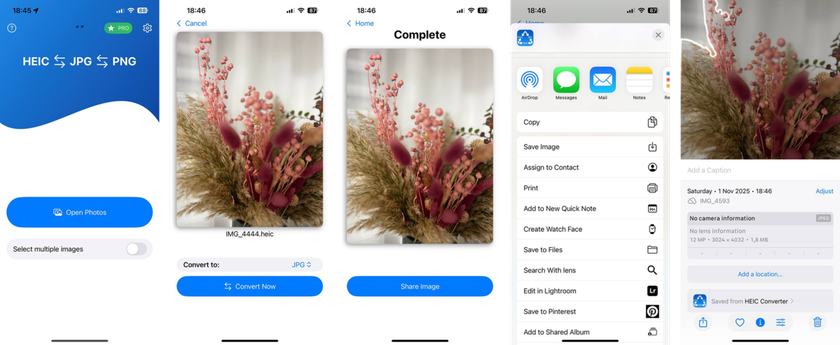
How to convert multiple HEIC files to JPG on a Mac? Selecting "Copy" will move your photographs to your iPhone's clipboard. There exists a "Save to" option; however, it does not modify the format. Make a separate folder and upload pictures there. Then, with the built-in Preview, switch HEIC images to JPG. Be watchful and patient until the conversion is completed. Otherwise, you may wind up with corrupted files that cannot be recovered.
Your AI-Powered Photo Editor for MacOS and Windows
Discover Now!How to Convert a Photo from HEIC to JPG on Mac: Step-by-Step Listing
Unlike JPG, HEIC is not a stand-alone format. For the past five years, photographers have struggled with choosing a converter for it. Additionally, the current MacBooks with Intel CPUs are slow; instead, software selections are limited to two or three reliable sources, excluding the App Store. It's the format's novelty and the app's versatility. How to change HEIC to JPG on iPhone? This is possible if you have an iPhone 7 or the newest one.
Check the steps in the list below.
Download and install the converter you pick from the App Store, then launch it.
Click "Select Images," then select the photos you want to convert.
Pick the "Share as JPG" button in the top corner.
Choose "Save Image."

Beginning with iOS 11, photographers' lives became easier. First and foremost, a built-in preview and converter have emerged. Sweetness, however, is accompanied by bitterness. The lack of color correction, intensity, and grain is unexpected for such a high-quality Apple camera. Therefore, turn HEIC to JPG on Mac still presents concerns.
Conversion Errors and How to Eliminate Them
 If you look closely at files on Apple devices, you'll notice the HEIF image format, which is indicated by the HEIC extension. In comparison to the JPG, it provides higher quality for the same-size file. However, due to the JPEG transparent background, converting the file can be tricky. The most serious of which is color loss.
The hard thing is that people may not notice a tiny change in color reproduction during quick viewing and wind up sharing a considerably paler photo online than it appears on the iPhone screen. So, what are the potential concerns, and how to avoid them? Check the table below to find out.
An issue | Description | The way to fix |
Converters do not embed the HEIC color profile | Third-party conversion providers often do not provide HEIS resolution. As a result, you will need to import it. However, this is half of the problem. The color adjustment will be applied based on the quality of the library. This indicates that the image may lose grain or light intensity after being converted. | You can easily equalize the color intensity of a PNG file in any photo editor that supports macOS. |
Version compatibility | Most Apple devices support HEIC files, although they may not work with other platforms or programs. HEIF format support is restricted. Full functionality is available on devices running iOS 11 (and later) or macOS High Sierra. | Don’t forget to update your data. |
The transcoder does not save the used profile | Because HEIC encodes images with the HEVC (High-Efficiency Video Container) or H.265 codec, these files feature transparency. However, given that they are not open source, changing to HTML is severely constrained. Thus, converting to PNG is considered re-encoding. This is where the most common system fault shows up: the user profile is not saved. | You ought to export the file in a PNG or another HTML5-compatible format. |
The output JPEG image has the Display P3 color profile | During conversion, the integer hue values of pixels are saved in Display P3 based on your file's parameters. During publishing, the image gains the sRGB profile, which causes color distortion. | For lossless pictures, first compress them to PNG format. Then, manually adjust the pixelation in the settings. |
The image's color profile does not match the current RGB working space | If color management is turned off, the image's RGB will be presented exactly as the monitor's RGB. When color management is switched on, the "image's RGB" is converted to "Lab" (or "XYZ"), and then to "monitor's RGB." | The operating system sets the monitor profile, whereas the picture editor determines the image profile. |
If you use up your device's storage space and then shoot in older formats, your iCloud storage will swiftly fill up. This occurs when you have iCloud Photos activated and have about 5GB of free memory. Furthermore, keep in mind that changing HEIC to JPG on Mac will take twice as much space. Select no more than 10 images for the social media publication. After posting, you may delete the JPG picture version.
Luminar Neo: Photo Editor That Boosts Your Images
 Experienced Japanese shooters like to say, "A good photograph, like donburi, should contain everything in one shot." This can additionally be applied to image editing. How to convert HEIC to JPG on Mac using iPhone software? You can convert HEIC to JPG on MacBook with Luminar Neo during editing.
The broad catalog of built-in filters allows for spot grain enhancement or extreme brightness of a single area. If a photo comes up with a broken frame, Lumina Neo can fix it. Even a blurry finger inadvertently caught in the shot can be converted into an attractive bokeh effect. If you don’t hear about one of the best Mac automatic picture editor, now you will. It has multiple AI functions and features for color balancing, layout correction, and much more.
Final Thoughts
Changing HEIC to JPG on Mac is the way that photographers use to have drafts and outlines at the same time on iPhone. While HEIC is ideal for storage, it's not always compatible with editors or client apps. Converting HEIC to JPG shouldn't disrupt your workflow. Using Luminar Neo, you can get three benefits at once: quick editing, JPG conversion, and enjoying the final image uploaded to Instagram or Pinterest. It's a one-click take!