How To Photograph Star Trails: Night Sky In Motion
July 30, 2025
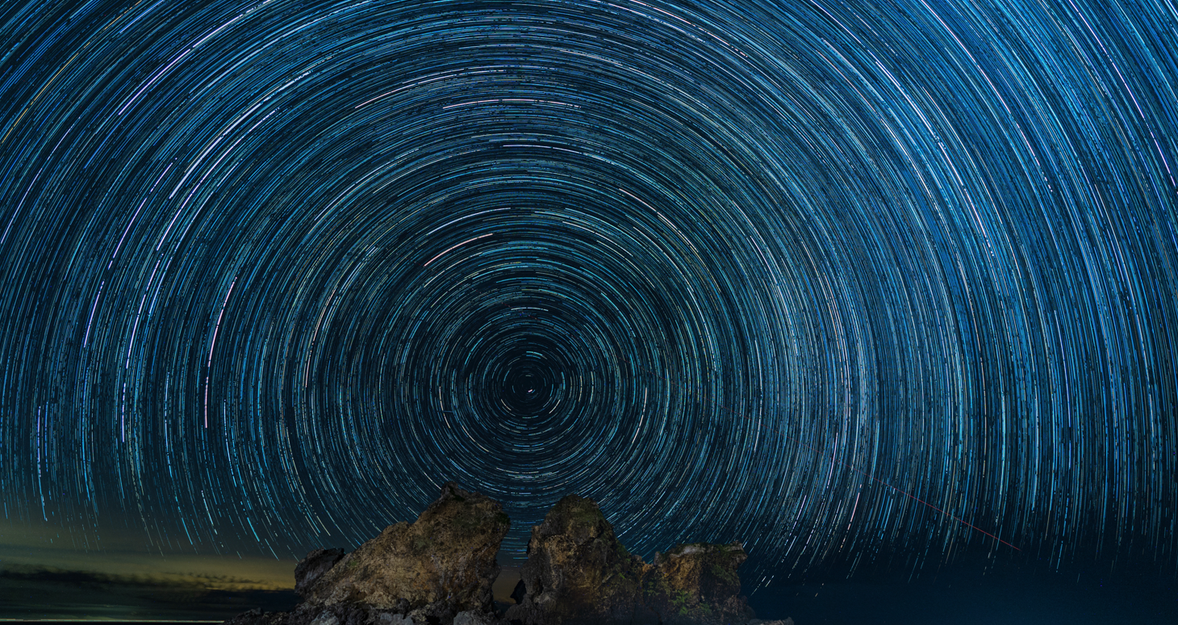
Want to add something bold and beautiful to your portfolio? Start with how to photograph star trails.
There is something truly magical about seeing the night sky come alive as stars swirl slowly overhead. But capturing that beauty in a photo takes more than just pointing the camera at the sky. If you’ve ever wondered how to shoot star trails, prepare for a fun and rewarding adventure.
Star trails happen because the Earth is spinning—the stars themselves aren’t moving, but they trace those beautiful circles from our view. You can make this happen for yourself with a little patience, the right gear, and a few handy tips. Let’s walk through the process step by step, so your next night under the stars could turn into a stunning work of art.
Why Star Trail Photography Is Worth Trying
 Photographing star trails is like painting with time—except instead of freezing a moment, you’re capturing motion. It’s a peaceful, patient process that teaches you to see the world differently. Star trail photography stands out; it looks alive. No matter how much experience one has or lacks thereof, this form of photography will challenge and inspire.
Your AI-Powered Photo Editor for MacOS and Windows
Discover Now!What You’ll Need Before You Head Out
 Before we discuss techniques and settings for star trail photography, let’s discuss gear. You don’t need expensive tools, but you do need the right ones.
Essential gear list:
Camera. A DSLR or mirrorless camera with manual settings
Sturdy tripod. To avoid any camera shake
Wide-angle lens. Something around 14mm–24mm works best
Remote shutter or intervalometer. Helps you shoot multiple long exposures
Extra batteries. Long shoots will drain power quickly
Memory cards. You’ll be taking dozens (or hundreds) of shots
A flashlight or headlamp with a red filter can also help you move around without disturbing the night vision.
Find the Perfect Location and Timing
 Location matters a lot. Light pollution from cities will drown out the stars. Find a dark, open space where the sky dominates.
National parks, countryside fields, mountain areas, or beaches often work well. Apps like Dark Sky Finder or PhotoPills help you scout the best areas. Aim for a clear, moonless night. You’ll get the most stars and the cleanest trails when the sky is darkest. New moon nights are ideal.
Choose the Right Composition First
 As you start to capture star trails, just stop for a second and think about what will make that picture unique. The night sky is the subject of interest, but throwing something interesting in the foreground has the potential to give your picture energy. Add:
A tree silhouette
An old barn or cabin
A winding road or rock formation
A body of water reflecting the stars
The goal is to balance the Earth and the sky. So, the more story you add to your shot, the more captivating it becomes.
Dial In the Best Camera Settings
 Now on to the technical details—setting the best camera settings for star trails. Either shoot one long exposure or a series of shorter ones and piece them together afterwards.
Common settings for stacked images:
Mode. Manual (M)
Shutter speed. 20 to 30 seconds per shot
Aperture. f/2.8 or as wide as your lens allows
ISO. Start at 800 and adjust depending on your camera’s noise performance
Focus. Manual focus, set to infinity (test beforehand)
Don’t forget to turn off image stabilization when the camera is on a tripod.
Reduce Noise and Polish Your Final Image
Noise is unavoidable when photographing long exposure night sky. The dark areas of the photo can get grainy, especially at higher ISOs. That’s where tools like denoise image come in handy. You can remove the grainy texture while keeping the details crisp, and this means the stars will pop without turning the photo into a blurry mess. Also, keep your camera’s long exposure noise reduction setting off. It doubles your processing time for every shot and may slow you down. Do the cleanup in post.
Add Some Magic With Creative Effects
 Consider adding soft touches if you want to enhance the vibe without over-editing. Subtle light effects can simulate moon glow or make a tree glow mystically. You don’t need to go wild. Just a hint of mood can make your photo feel more alive. It’s about enhancing the natural wonder, not replacing it.
Stack Images for Longer Trails
 Most photographers prefer the stacking method. It keeps noise levels low and gives you more control.
Set your camera to take continuous 20–30 second exposures
Use an intervalometer or a remote timer to avoid touching the camera
Capture between 100 and 300 images
Import the photos into software like StarStaX or Photoshop
Stack them together for a full-circle star trail look
This method makes fixing light pollution or passing car lights in single frames easier, without ruining the entire image.
Real Talk: Star Trails Take Time
 This isn’t a quick snap kind of project. You’ll be standing in the dark, waiting for your camera to do its thing. But the quiet makes it almost meditative.
Here are a few star trails photography tips from the field:
Bring a friend. It’s safer and more fun.
Dress warmly. Even in summer, nights can get cold.
Be patient. Sometimes clouds roll in. Sometimes gear fails. It happens.
The beauty of star trail photography settings is that they’re simple once you get the hang of it. But the results? They’re totally worth the wait.
Add Life to Your Edit Without Overdoing It
 Post-processing your star trail shot should be about clarity and atmosphere. Clean up the sky, adjust the contrast, and maybe boost the foreground. If you’re unsure where to start, try an AI photo filter that automatically adjusts lighting, tones, and detail. It is convenient and usually leaves you with a good starting point before fine-tuning it yourself. But remember that a good edit begins with a solid original image. Attempt to do as much right in-camera as possible.
Final Checklist: What to Do Before You Start Shooting
Here’s a quick rundown to ensure you’re ready before pressing that shutter:
Check the weather for clear skies
Scout a dark location away from city lights
Charge all batteries and clear the memory cards
Pack your gear, plus snacks and water
Set the focus before it gets too dark
Use a red flashlight to preserve night vision
Be respectful of nature and clean up afterward
Exclusive Tools of Endless Possibilities in One AI Editor
Explore Now!Explore Night Photography With Your Phone Too
 You don’t need a fancy camera to explore night sky photography. Modern smartphones are more powerful than ever. Some models can now capture long exposures, adjust ISO manually, and even reduce motion blur automatically. People have photographed the Milky Way with only their phone and a steady tripod. If you’re curious, check out these tips for taking awesome night sky photos on iPhone to get started with what you already have.
Want To Go Even Deeper?
If you’re ready to improve your astronomy skills, here’s a great guide on how to take pictures of stars. It walks you through beginner and advanced setups, so you’ll always learn something new. Many photographers use it as a go-to reference when experimenting with new techniques. The tips are practical, not overly technical, so they’re easy to apply. Even seasoned shooters often find fresh insights that elevate their star photos.
Bringing It All Together
 Shooting star trails is one of the most rewarding things you can do as a photographer. It combines technique, patience, and creativity—and leaves you with stunning results that show Earth’s movement across the cosmos. Whether a novice at this or wanting to hone their talent, the night sky is always ready to share a new tale. Pack the equipment, step outside after the sun sets, and let your camera do the rest. Your star trail journey starts with one click—just ensure it’s set at a minimum of 30 seconds.