10 Secrets of Streetscape Photography
September 23, 2025
Discover 10 secrets of streetscape photography. Learn how to capture urban environments with expert street photography tips for stunning, professional shots.
You are traveling to new cities or countries, surrounded by the beauty of a new place. The weather is wonderful, the sky is a bright blue, and there are many plants around. And you decide to capture the architecture that you like. There you go, that’s your first step into streetscape photography!
Street photography is a genre of photography that aims to capture the urban environment and reflect its unique features. In this article, we’ll show you tips on streetscape photography that will help you capture professional-looking images.
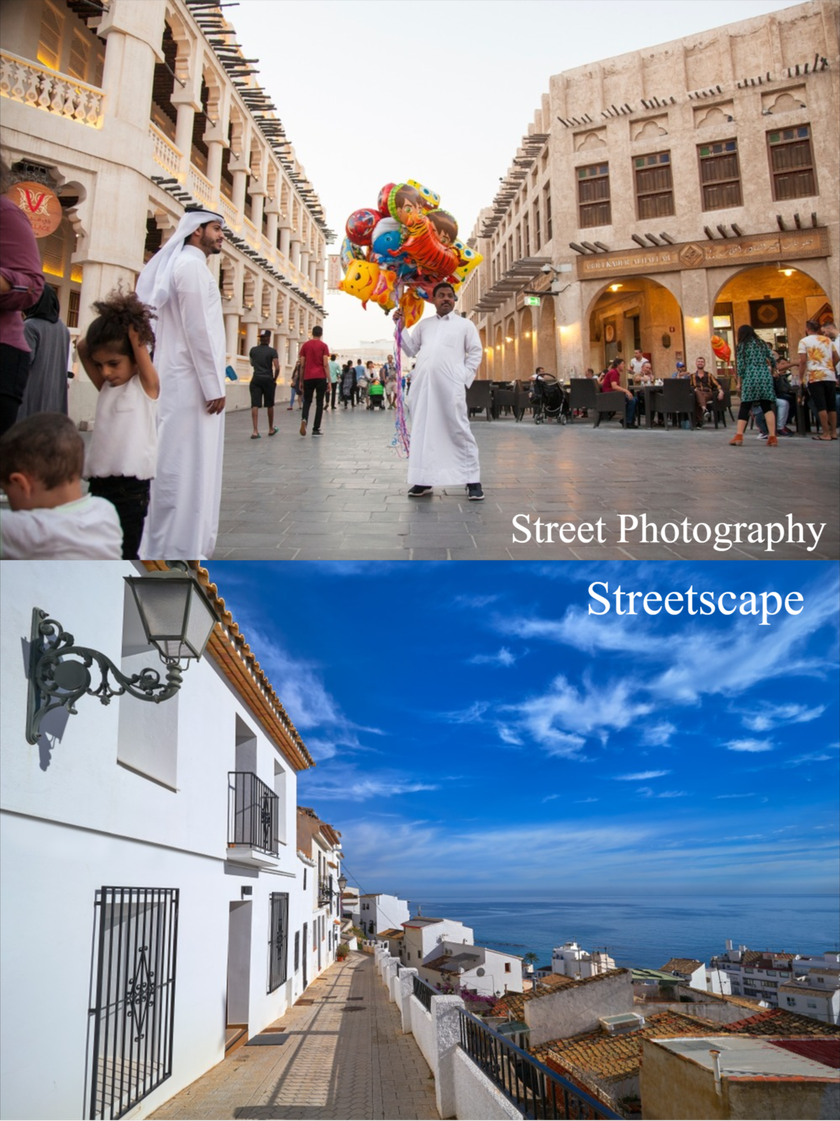
Street Photography VS Streetscape
Photographers often encounter confusion about terminology, so let's begin by examining the definition of the term. The main feature is that street photos focus on people and their emotions. Streetscape photography can focus on architecture, weather, streets, and buildings, capturing the essence of urban environments.
Often, you can see people interacting with urban spaces. When exploring street photography tips, the main thing is to bring the atmosphere and culture through the attributes inherent to the space.
Your AI-Powered Photo Editor for MacOS and Windows
Discover Now!Secret 1: Shoot at the Right Time of Day
One of the main rules of good photography is lighting. For professional shots, choose the “golden hour.” This is the last hour before sunset and the first hour after sunrise. The sun is at a low angle in the sky, creating longer shadows and good lighting conditions. At this time, the light is softer and takes on more yellow, orange, and red hues. This allows you to carry a sense of happiness and harmony.
After sunset, the so-called “blue hour” begins. This is the time when the light takes on a rich blue color. If the “golden hour” lasts 30-60 minutes (depending on the season and latitude), then the “blue hour” lasts 20-40 minutes. Therefore, it is necessary to prepare in advance. There are many apps for determining the shooting time. For example: Golden Hour One, PhotoPills, Sun Surveyor, and The Photographer's Ephemeris.
And if you missed these hours, you can imitate similar light. Use warm reflections from windows, lamps, or neon lights. Choose according to your shooting time.
Secret 2: Pay Attention to Light and Shadows
When creating city life photography, always pay attention to the direction of light. Try standing with your back to the sun and try to photograph the city. This way, the light will fall on the objects in the photo and head toward the lens.
Look for objects in the shade, but make sure that light falls on them from the opening. For example, a person walks out of a dark corner, and after a couple of steps, the area is filled with sunlight. This is a great opportunity to photograph a person against a dark background.
Try to find people wearing light-colored clothing in a crowd. This way, they will stand out against the backdrop of gloomy weather and other passersby.
At night, when it is almost dark, try to capture a person walking and looking at their phone. This way, you can highlight your model against the darkness and illuminate their face. Bright lights from shops often provide colorful lighting.
And to complete your experience with light, you need to use the right processing. With Luminar Neo, you can enhance any frame. Turn it into a story of the city. And mainly, emphasize colors, restore details, and adjust light and shadows.
Secret 3: Decide if People Belong in the Frame
 Define your goals and outline your intentions before shooting. People are included in the frame to:
Take the scale of a city or buildings;
Show how lively a city is (people on public transport, passers-by, colorful personalities);
Create an emotional accent (for example, when someone stands out from the crowd or expresses emotions);
Create contrast (the movement of the city vs. the static nature of a monument);
Carry the atmosphere (e.g., a child sitting on a bench enjoying ice cream in summer).
When there are too many people in the frame and they are not major to the plot, use a long exposure. They will turn into blurry silhouettes, while you will preserve the effect of movement.
Secret 4: Capture Architecture With Care
 Get the right equipment. A full-frame camera captures a wider range of details between light and shadow, which helps reduce digital noise. A tilt-shift lens corrects the perspective and does not distort lines, unlike a fisheye lens. To ensure that the lines are clear, architecture should be photographed with a small aperture and low ISO sensitivity. Therefore, consider using a tripod to stabilize the camera.
Natural spaces are perceived from a horizontal perspective. Therefore, keep vertical lines at a 90-degree angle. Often, the camera is pointed upward (but not too much), and then the perspective is corrected. Then the building narrows toward the top, and the lines will be straight.
Use a one-point perspective for shooting facades. For a correct one-point perspective, you need many parallel horizontal lines at a 0-degree angle. If you keep the lines at a 90-degree angle, you will get a two-point perspective. This perspective adds depth to the image and creates a sense of movement.
Secret 5: Show the Energy of City Traffic
 When there is a lot of daylight, use a short exposure time of 1/250 sec or faster. Turn on burst mode to capture the object in motion. If you want to blur the action, set the exposure time to 1/30-1/60. Follow the camera with the selected object. The object you focus on will be clear, and everything else will be blurred. To create a more atmospheric shot during the blue hour, you can add a fog effect. To do this, use Streetscape Fog & Lights LUTs, which emphasize the light and depth of the scene.
When looking at street photography examples, pay attention to how professionals use different exposures and camera movements. This will give you an eye for detail and allow you to experiment with settings on your own to shift the dynamics of the city.
To freeze motion at night, use a fast shutter speed (1/200, 1/500, or faster). To create light trails from neon signs or car headlights, use a slow shutter speed (1-10 seconds). Usually, the ISO value is increased at night. But keep in mind: the higher the ISO, the more graininess in the photo.
Secret 6: Use Angles to Change the Perspective
 To emphasize the height and scale of the structure, lower the camera angle (lower it closer to the ground). Include the sky in the frame to add depth to the photo. Adding foreground elements (plants, people, or other cultural attributes) will make the photo more interesting and detailed. With the Streetscape Mastery Bundle, you can edit your photos to make them look professional and better convey the atmosphere.
For bird's-eye shots, use a drone or find a spot above street level. Use a wide-angle lens to capture more detail. Set a fast shutter speed (1/250 and faster) and choose an aperture of F/8–F/11 for depth of field.
Secret 7: Create Natural Frames
 One technique is to use arches and foreground elements to create a sense of observation. Tree branches in the foreground are great for adding color to a photo. A tunnel arch or the space under a bridge can help you focus on the main subject. The effect of photographing through a window is often used. For example, you can sit in a café and watch people through the window.
Secret 8: Play With Color and Contrast
 There is a life hack for checking whether a color photograph has been taken successfully. Apply a black-and-white filter to it. If the photo looks good either way, then your color street cityscape photography is not very good.
The easiest way is to choose one color and shoot it. It is acceptable to use shades of the chosen color. Leave one color in the frame and make it bright. Then, against the background of a darker city, for example, the bright blue color of a car, sign, or shop window will stand out. If you want to diversify your photo, use contrasting colors so that they seem to fight each other.
Remember the basic rules:
There should not be too many colors; 1-3 will be enough.
Pay attention to natural light, as the brightness of the colors of objects depends on it.
Consider the cultural context of the meaning of each shade.
Post-processing photos is one of the most fundamental stages. And with Luminar Neo, it becomes much faster. The program allows you to adjust brightness, contrast, and saturation. Built-in AI will improve photos even in difficult lighting conditions. Try creating professional photos now!
Discover unique presets, luts, skies and other assets
Visit MarketplaceSecret 9: Bring Atmosphere Through People
 People in the frame can convey the mood of a city, street, or neighborhood with the greatest vividness. Observe what they often do in your chosen space. This way, you will transport the most common actions that people do in a particular place. Pay attention to their mood and emotions. It could be a meeting place where people smile, or a place of sad people who are constantly forced to work.
The clothes worn by passers-by reflect the weather and create the mood of urban street photography. Don't forget the little things. What reflects this place? Perhaps coffee in their hands while walking. It indicates that the city is fast-paced; they don't have time for slow movements. Alternatively, it could be a market bag, indicating that the city is renowned for its farms and natural products.
Secret 10: Experiment with Night Photography
 For night photos, use the manual mode on your camera. Light always falls differently, so it is worth adjusting to the brightness of the lighting and the darkness of the night. You will also need a long exposure. So take a tripod with you to ensure the quality of your photos.
To capture light, use a lens with a large aperture (F/1.8, F/2.8). To avoid noise, set the exposure to the lowest value. After shooting, work with the white balance in the editor, because each light has a different temperature. Also, adjust the shadows, because they create depth in the photo.
The Bottom Line
Streetscape photography is all about noticing details, light, and atmosphere that others might pass by. By experimenting with timing, angles, people, and colors, you can transform everyday streets into powerful visual stories. Whether you’re shooting at sunrise, chasing city lights at night, or framing architecture with precision, each of these secrets helps you capture the unique rhythm of urban life. Take your camera, explore your surroundings, and let the city itself guide your creativity.