Long Exposure Photography: The Ultimate Guide
Last Updated on September 22, 2025
Master long exposure photography with this ultimate guide. Learn camera settings, gear, and techniques to capture light trails, silky water, and starry skies.
Photographers looking for dreamy, surreal effects often turn to long exposure photography. By extending the shutter speed, the camera sensor records motion in a way our eyes can’t: water turns silky, car lights paint glowing trails, and stars trace patterns across the night sky. With the right settings, ordinary scenes transform into striking, artistic images that reveal the hidden beauty of movement and time.
What is Long Exposure Photography?
 Long exposure photography is a technique where the camera’s shutter stays open longer than usual to let in more light. Instead of freezing a moment, the camera records motion over time. That’s why moving elements like water, clouds, car lights, or even stars turn into smooth trails or patterns while still objects remain sharp.
Typical Settings:
Shutter speed: 1–30 seconds (or even several minutes in bulb mode).
Aperture: f/8–f/16 for balanced sharpness and depth.
ISO: 100–200 to keep noise low.
To balance these controls, the motion becomes indistinct, but still the still images remain sharp, producing long exposure in photography and artistic photos.
Your AI-Powered Photo Editor for MacOS and Windows
Discover Now!Types of Long Exposure Shots
What do you want time to look like — glowing rivers of traffic, mist-soft water, empty streets, or circles of stars? With long exposure shots, tiny tweaks in shutter speed can switch the mood from restless motion to calm abstraction.
This section gives you a quick tour of the most popular looks, why they work, and the starting settings to try. By the end, you’ll know which effect fits your idea and how to shape a long exposure photo that matches it. For finishing, the best photo editor helps balance white balance, lift shadows, and refine highlight detail without smearing star points.
Night Photography
Long exposure photography at night relies on shutter speeds from 10 to 30 seconds to collect faint light sources. A remote shutter release and a tripod minimize vibration, and ISO 100-400 maintains noise. f/2.8 is used in darker situations, and f/8-f/11 provides greater depth in urban scenes. 
Waterfalls and Rivers
Moving water reacts differently depending on the shutter speed. Rapid currents are smoothed by exposure of 1-8 seconds, and a fog effect is produced on still streams by exposure of 15-20 seconds. The neutral density filters eliminate overexposure, and maintaining the ISO low produces clean long exposure shots.
Seascapes and Waves
The 5 seconds of exposure in coastal photography softens the texture of the waves, and 30 seconds transforms the sea into a flat surface. The 10-stop filter is commonly needed during the daytime. The sharpness of the foreground objects, such as rocks or piers, is done manually.
Cityscapes and Light Trails
Exposures of 15-25 seconds create continuous traffic light ribbons, while buildings stay sharp at f/11-f/16, and low ISO prevents blown highlights. To control glare from street lamps, mount a sturdy tripod and learn what a lens hood is and how to use it to block stray light, keeping long exposure photos clean and balanced.
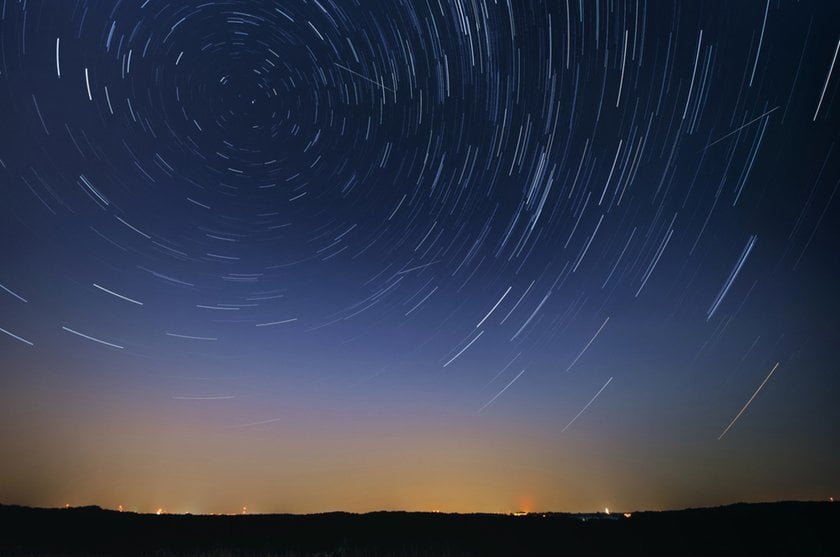
Star Trails and Astrophotography
Traditionally captured with very long single exposures, but today it is usually built by stacking multiple shorter frames to control heat and noise. Use a wide-angle (14-24 mm), f/2.8-f/4, ISO 800-1600, and shoot 15-60 s frames for 30-120 min total; lock focus at infinity and disable long-exposure NR that adds gaps. For trails, keep the tripod fixed; for pinpoint stars, use a tracker. Combine the sequence in software to produce a clean long-exposure picture.
Cloud Streaks and Weather Effects
Exposures of 30 seconds to 5 minutes show moving clouds in the form of stretched lines. Powerful ND filters are required during the daytime, and focusing by hand is more stable. The presence of foreground elements such as mountains or buildings provides scale to the long exposure photographs and makes them documents of the changing weather.
Essential Gear for Long Exposure Photos
To capture good long exposure shots, it is invaluable to have equipment that can assist in accurate settings and stability. What to look for in each component, how to choose it, and how not to sacrifice image quality in long exposure shots?
Component | Key Features to Consider | Typical Price Range (USD) |
Camera (DSLR or Mirrorless) | Full manual control + bulb mode for exposures >30 s; clean high-ISO performance; full-frame offers better light sensitivity | $700-$3,000 (mid to high-end) |
Lenses | Wide aperture (f/1.4-f/2.8) for low light; sharp at f/8-f/16; wide-angle for star trails | $400-$2,000 depending on brand |
Tripod | Stable, vibration-resistant, ideally aluminum or carbon fiber; capable of holding under long exposures | $100-$500 |
Neutral Density (ND) Filters | 3-stop, 6-stop, 10-stop variants to reduce light; avoid color cast; filter type (screw-in vs square) | $50-$300 |


Smart buying is about sequencing upgrades, not repeating spec lists: start with a sturdier tripod and a 6-stop ND to make your long exposure shots stable in daylight, add a 10-stop for slower motion, then pick a wide-angle with low coma so your long exposure photos stay clean to the corners. For creative highlights, experiment with the lens flare effect when the scene benefits from controlled glare.
Transform Your Photos into Classic Monochrome
Try it in Luminar NeoStep-by-Step Guide: How to Take Long Exposure Photos
Learning long-exposure photography requires planning, control of technical settings, setting up Your Gear, and other stages. All of them influence the outcome, be it scouting the scene or processing the frame that was taken. Next, we'll walk you through the entire process that makes your images predictable, clear, and creative.
Step 1: Plan Your Shot and Study the Scene
 Before shooting, study the scene for moving elements like water, clouds, or traffic that add motion blur to a long exposure photo. Twilight is more balanced in light and control, and night produces dramatic images of stars and cityscapes.
Step 2: Choose the Right Camera Settings
 Balancing shutter speed, aperture, and ISO creates the foundation for quality shots. While shutter speed determines how blurry or smooth the motion is, aperture controls the depth of field and the amount of light, and ISO affects the level of noise. Only by properly combining these three parameters can a photographer get a sharp image with the desired effect of motion, avoid flare, and at the same time preserve detail in the bright and dark areas of the frame.
However, fully manual cameras give you more freedom to fine-tune the results. If you are choosing between Nikon and Canon cameras, both brands offer DSLR and mirrorless options with bulb mode and excellent low-light capabilities.
Manual Mode: Full Control Over Exposure
Manual mode provides 100% control over shutter speed, aperture, and ISO, eliminating automatic adjustments. Long exposure shots cannot be achieved without it, as well as when taking bulb mode shots with long exposure times, such as star trails or cloud streaks.
Aperture, ISO, and Shutter Speed Explained
Aperture: Use f/8–f/16 for landscapes and cityscapes, or wider (f/2.8–f/4) in darker scenes to let in more light.
ISO: Keep it low (100–200) to reduce noise.
Shutter speed: Adjust based on motion. Around 1s smooths flowing streams, 30s can flatten the sea, and bulb mode lets you capture dramatic star trails. If grain appears, tools like noise reducing software help clean shadows while preserving detail.
Step 3: Set Up Your Gear Properly
 Long exposure photography requires a stable tripod because any vibration can destroy a shot. Turn off stabilization systems, use a remote shutter release or timer, and shield the viewfinder from stray light to keep the long exposure photo sharp.
Step 4: Focus and Compose Your Long Exposure Picture
 Get out of the focus and lock onto a point or a bright edge with accuracy. Compose carefully, including foreground elements or leading lines, so the motion blur supports the scene and gives depth to the picture.
Step 5: Use ND Filters to Extend Exposure Time
 The neutral-density filters block more light reaching the lens and allow longer shutter times on bright days. A 6-stop filter is suitable for rivers, while a 10-stop filter is best suited for clouds or seascapes, maintaining balance in long exposure pictures and keeping them creative.
Step 6: Take the Shot and Review the Histogram
 An extreme can be to press the shutter with a remote or timer to prevent shake and then examine the histogram rather than the LCD preview. Make sure that highlights are not lost or shadows are not flat, and use a shutter or aperture to equalize the long exposure shot when it appears unbalanced.
Step 7: Post-Processing Your Long Exposure Photos
 A dedicated tool like Luminar Neo is especially effective for editing long exposure images. It provides noise reduction AI based on clean skies and accurate color correction of ND filters casts, as well as powerful tools to increase contrast without detail losses. Using Luminar Neo to make an edit, you can reclaim depth of shadows, make small adjustments to highlights, and even selectively adjust either the foreground or background.
Creative Long Exposure Photography Ideas
Long exposure is a creative playground. By experimenting with different shutter speeds, filters, and subjects, you can turn everyday scenes into surreal works of art. Here are some inspiring ways to use long exposure to push your photography further:
1. Capturing Light Trails for Dramatic Cityscapes
Few techniques showcase the magic of long exposure better than light trails. By setting your shutter speed between 15–30 seconds, using an aperture of f/8–f/16, and keeping ISO low (100–200), you can turn traffic into glowing ribbons against a sharp city backdrop. A tripod and remote release are essential to avoid shake, while a lens hood helps reduce glare from street lamps. Time your shots for when traffic is heaviest, and carefully meter the bright lights to prevent overexposure. The result is a clean, dramatic cityscape where static buildings stay sharp while the streets come alive with motion.
2. Using Long Exposure for Stunning Water Effects
Water reacts beautifully to shutter speed. A 1–8 second exposure smooths rapid currents into silky textures, while 15–30 seconds can turn calm streams into a fog-like mist. Pair this with an aperture of f/8–f/11 and keep ISO at 100 for the cleanest files. To control brightness, use a 3–10 stop ND filter (with a polarizer optional for reflections) and mount your camera on a sturdy tripod. For best results, lock focus on a static foreground object and experiment with different shutter speeds until the texture of the water matches your vision.
3. Black and White Long Exposure Images
Long exposures can be especially striking in black and white. With shutter speeds of 10–60 seconds, an aperture of f/8–f/16, and ISO set to 100, you can emphasize contrast, shapes, and patterns. A strong 6–10 stop ND filter is usually required in daylight, and shooting in RAW gives you flexibility in post-processing. When converting to monochrome, use channel mixing to control tones and highlight midtones for depth. Here, composition and form are everything — the lack of color lets texture and movement take center stage.
4. Experimenting with Ultra-Long Shutter Speeds
For the truly adventurous, pushing exposures into the 2–10 minute range unlocks surreal effects. Set your aperture to f/8–f/11 and keep ISO low (50–100). Achieving these exposures usually requires a 10-stop ND filter or stacked filters, plus a remote shutter with a lock and a covered viewfinder to prevent light leaks. Watch out for changing light and rising sensor heat during long takes. Reviewing the histogram between shots helps fine-tune results. Ultra-long exposures can transform clouds into soft streaks or turn a busy street into an empty stage.
5. Long Exposure Street Photography
Blending the static with the dynamic creates powerful street images. With shutter speeds of 2–8 seconds, apertures of f/8–f/11, and ISO between 100–200, you can capture sharp architectural details alongside blurred crowds. A tripod or clamp keeps the camera steady, and in daylight, a 3–6 stop ND filter is needed to avoid overexposure. Focus manually on an immobile subject, then let the flow of people blur around it. The result is a photograph that feels alive — a frozen cityscape animated by ghostlike human motion.
Common Mistakes and How to Avoid Them
 Novices in long exposure photography often still encounter technical problems, which can lower the quality of the image, even with practice. Overexposed frames, unwanted blur, or digital noise can easily ruin a photo if the basics are overlooked. Soon after discovering these errors, photographers will become more proficient in their workflow and produce more creative, clean, and sharper long exposure images.
1. Overexposure → Use ND filters & check histogram
Shooting RAW allows highlight recovery later with tools like a free photo editor for beginners. Overexposure is common in long-exposure photos, especially in daylight. Use ND filters, narrow the aperture to f/11–f/16, or lower the ISO to 100. Always check the histogram and, if needed, shorten the shutter speed.
2. Color casts from ND filters → Correct in post
Strong ND filters sometimes add unwanted tints to long exposure photos, usually shifting colors toward blue, green, or magenta. Minimize the effect by shooting in RAW and pre-setting a custom white balance. Temperature and tint sliders can be adjusted, or selective correction can be applied in post-processing to remove the unnatural tones present in long exposure images.
3. Light leaks → Cover the viewfinder & seal gaps
Light leaks during long exposure photography often come from the viewfinder or poorly sealed lens mounts. Put a cap over the viewfinder, wrap gaffer tape around filter holders when necessary, and do not point the camera in the direction of stray artificial lights. These precautions keep your photos evenly exposed and free from distracting flares.
4. Focusing errors → Switch to manual focus
Blurry long exposure pictures usually result from autofocus hunting in low light. Toggle to manual focus, Zoom in on the live view, and focus on a bright object or a distant bright light source. After focus is achieved, switch off autofocus to avoid any accidental refocusing of the shot, and you will have sharp photos.
5. Camera shake → Stabilize with tripod & remote
Even a slight vibration ruins a long exposure shot. You mount the camera on a firm tripod, turn off stabilization, and open the shutter using a remote or timer. To be safe, protect the setup against wind and use a cover to shield the viewfinder to ensure very sharp long exposure shots.
Mastering Long Exposure Photography
 Long-exposure photography integrates precision of technique and vision, transforming the common movement into the expression of beauty. With the appropriate equipment, scene planning, and exposure discipline, photographers can capture images that reveal detail, emotion, and motion well beyond the capabilities of the human eye.
These images are refined through post-processing as color is corrected, noise removed, and creative intent enhanced. With patience and practice, every photo presents an opportunity to convey time as a powerful visual narrative, resulting in long exposure pictures that stand out in any portfolio.
FAQ
What is the best time to shoot long exposure pictures?
Early morning, twilight, or nighttime provides balanced light and reduces the risk of overexposure.
How do I avoid blurry long exposure images?
Use a sturdy tripod, remote shutter release, and manual focus to keep the scene sharp.
Can I take long exposure photos without an ND filter?
Yes, but ND filters make it easier to extend shutter times in daylight without overexposing the frame.
Do I need a tripod for long exposure pictures?
Yes, stability is essential to prevent camera shake and keep static elements sharp during long exposures.
What is the best shutter speed for long exposure shots?
It depends on the subject: 1-5 seconds smooths water, 15-30 seconds captures light trails, and bulb mode handles star trails.
How to take long exposure photos?
Use manual mode, set a slow shutter speed, mount the camera on a tripod, and keep ISO low for clean results.